martedì 26 gennaio 2021

NSX-T 3.0 - While deleting Logical Segment, it got stuck in “Deletion in Progress” state and grayed out from UI.

Issue
Today, I have been called by a customer to solve a rather unusual problem. The process of deleting a Logical Segment on an NSX-T 3.0 infrastructure it got stucked in "Deletion in Progress" state for days and grayed out from UI without therefore to have the possibility to take any kind of action.


I tried to look for further information regarding the LS stuck

I tried to verify if by editing, in some way it was possible to undertake and/or force cancellation operations ...

I switched to Manager mode to have a different point of view ....
I noticed that there was a "Logical Port" that could block the deletion process ...

open, I tried to delete it, but here too the DELETE botton was grayed out ...
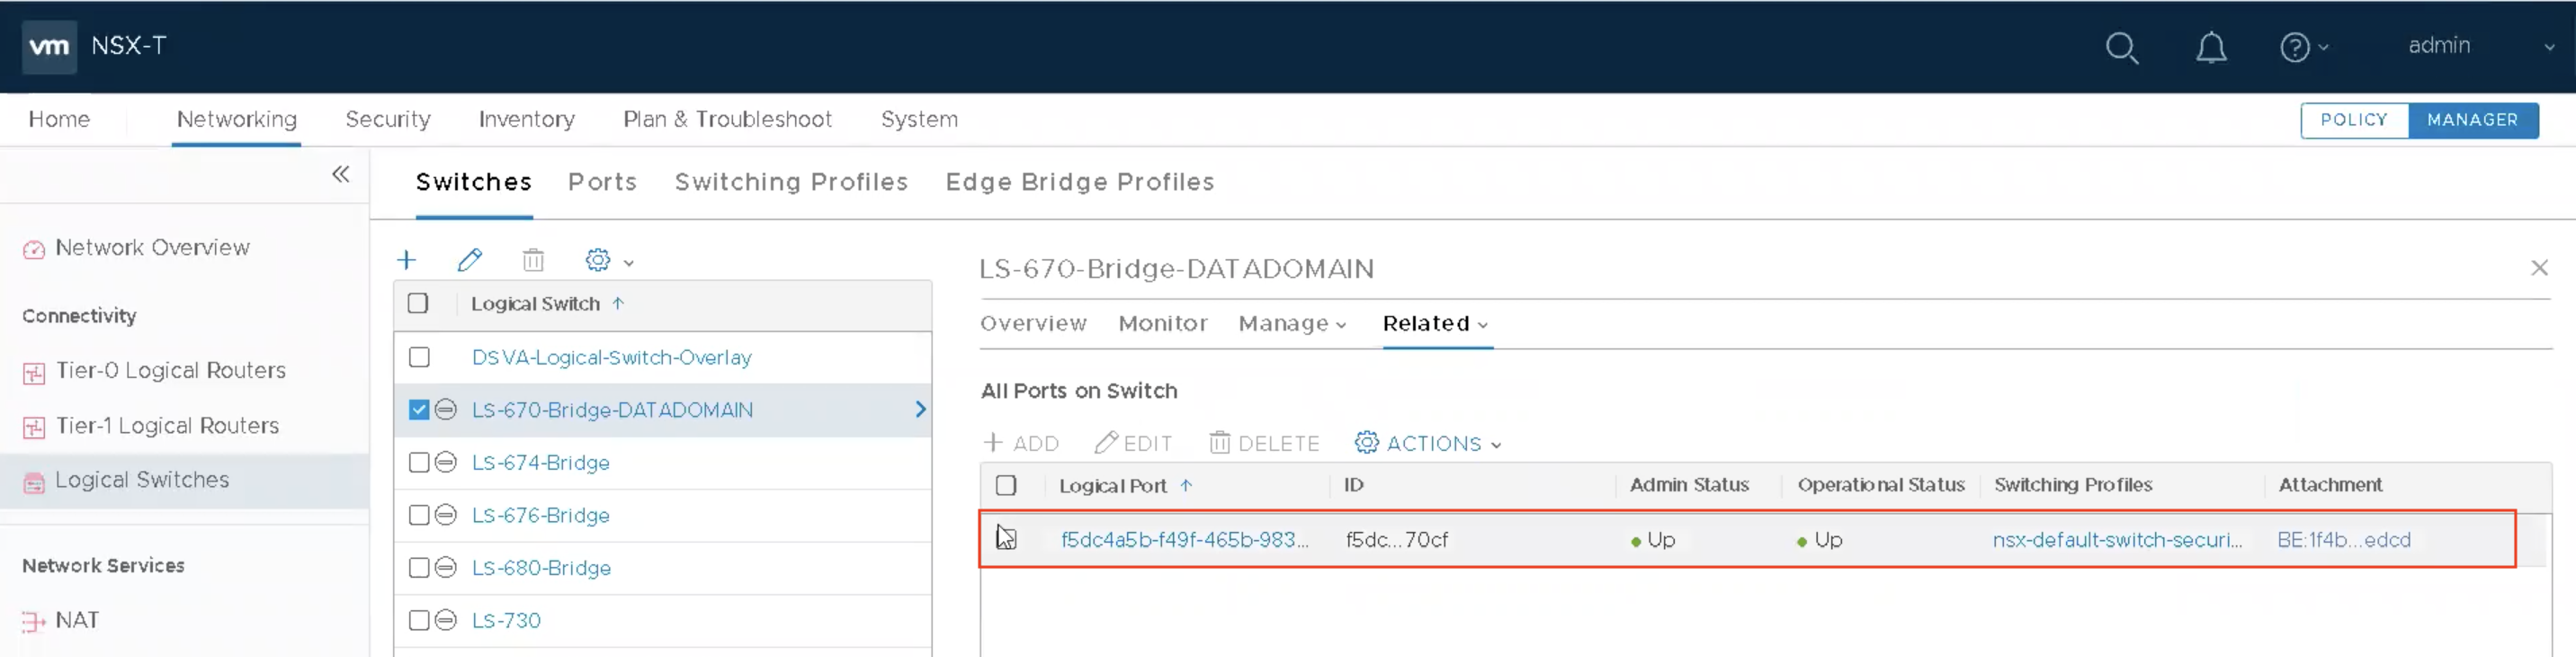
Then I decided to deep investigate inside the NSX-T Manager console in the following way as detailed below....


Disclaimer: Procedures described below may not be officially supported by VMware. Use it at your own risk. Before to perform any action described be sure that you have a valid backup. The best way is to open a Service Request to the support.


Solution
First of all I logged in via SSH to NSX-T Manager with the admin user and then raised the permissions to the root user level.

I moved into the directory "/var/log/policy" ...
root@NSXM-01:~# cd /var/log/policy/ 
Checked the policy.log log file for information about the switch to delete. In my case (verifying the dates) the information I was looking for were present in the .1.log.gz file ...
root@NSXM-01:/var/log/policy# zcat policy.1.log.gz | grep -i <LS NAME> 

I therefore wanted to check the realized state. When you make a configuration change, NSX Manager typically sends a request to another component to implement the change. For some entities, if you make the configuration change using the API, you can track the status of the request to see if the change is successfully implemented.

The configuration change that you initiate is called the desired state. The result of implementing the change is called the realized state. If NSX Manager implements the change successfully, the realized state will be the same as the desired state. If there is an error, the realized state will not be the same as the desired state.

Below the command executed to check the Logical Segment in stuck and the output ...
root@NSXM-01:/var/log/policy# curl -k -u admin -X GET "https://localhost/policy/api/v1/infra/realized-state/realized-entities?intent_path=/infra/segments/LS-670-Bridge-DATADOMAIN"
Enter host password for user 'admin':
{
  "results" : [ {
    "extended_attributes" : [ {
      "data_type" : "STRING",
      "multivalue" : false,
      "values" : [ "/infra/tier-1s/T1-Gateway" ],
      "key" : "connectivity_path"
    }, {
      "data_type" : "STRING",
      "multivalue" : true,
      "key" : "l2vpn_paths"
    } ],
    "entity_type" : "RealizedLogicalSwitch",
    "intent_paths" : [ "/infra/segments/LS-670-Bridge-DATADOMAIN" ],
    "resource_type" : "GenericPolicyRealizedResource",
    "id" : "infra-LS-670-Bridge-DATADOMAIN-ls",
    "display_name" : "infra-LS-670-Bridge-DATADOMAIN-ls",
    "path" : "/infra/realized-state/enforcement-points/default/logical-switches/infra-LS-670-Bridge-DATADOMAIN-ls",
    "relative_path" : "infra-LS-670-Bridge-DATADOMAIN-ls",
    "parent_path" : "/infra/realized-state/enforcement-points/default",
    "unique_id" : "13fd4bf5-f067-4806-9317-93013928b0d0",
    "intent_reference" : [ "/infra/segments/LS-670-Bridge-DATADOMAIN" ],
    "realization_specific_identifier" : "11104acc-5aac-4e50-8689-c31492d455f4",
    "realization_api" : "/api/v1/logical-switches/11104acc-5aac-4e50-8689-c31492d455f4",
    "state" : "ERROR",
    "alarms" : [ {
      "message" : "Unable to delete logical port with attachments of LogicalPort LogicalPort/f5dc4a5b-f49f-465b-9832-86151b3670cf.",
      "source_reference" : "/infra/realized-state/enforcement-points/default/logical-switches/infra-LS-670-Bridge-DATADOMAIN-ls",
      "error_details" : {
        "error_code" : 8402,
        "module_name" : "NsxSwitching service",
        "error_message" : "Unable to delete logical port with attachments of LogicalPort LogicalPort/f5dc4a5b-f49f-465b-9832-86151b3670cf."
      },
      "resource_type" : "PolicyAlarmResource",
      "id" : "REST_API_FAILED",
      "display_name" : "a2759a0c-0c98-4e6b-abd0-c58ea326c5be",
      "relative_path" : "a2759a0c-0c98-4e6b-abd0-c58ea326c5be",
      "unique_id" : "fe05784c-3f69-4ca8-9a01-9df9e3750e8b",
      "_system_owned" : false,
      "_create_user" : "system",
      "_create_time" : 1611589503519,
      "_last_modified_user" : "system",
      "_last_modified_time" : 1611589503521,
      "_protection" : "NOT_PROTECTED",
      "_revision" : 0
    } ],
    "runtime_status" : "UNINITIALIZED",
    "_system_owned" : false,
    "_create_user" : "system",
    "_create_time" : 1610550767404,
    "_last_modified_user" : "system",
    "_last_modified_time" : 1611229785697,
    "_protection" : "NOT_PROTECTED",
    "_revision" : 42
  } ],
  "result_count" : 1
}
root@NSXM-01:/var/log/policy#
From the previous output it is evident that the Segment is in an ERROR state, because it is blocked by the logical ports which are still being attacked .....

"message" : "Unable to delete logical port with attachments of LogicalPort LogicalPort/f5dc4a5b-f49f-465b-9832-86151b3670cf."

Next step, is to attempt to delete the STALE Logical Port via UI. Owever, as we realized before is not possible to delete Logical Port via UI. The second option is to delete the logical port via API which fails too if you use vanilla Logical Port DELETE operation.
Before to delete it, I retrieve information about the Segment and perform NSX-T backup... in case they will be needed later....
root@NSXM-01:/var/log/policy# curl -k -u admin -X GET "https://localhost/api/v1/logical-ports/f5dc4a5b-f49f-465b-9832-86151b3670cf"
Enter host password for user 'admin':
{
  "logical_switch_id" : "11104acc-5aac-4e50-8689-c31492d455f4",
  "attachment" : {
    "attachment_type" : "BRIDGEENDPOINT",
    "id" : "1f4bd81c-83c6-43be-b690-a9aac5a6edcd"
  },
  "admin_state" : "UP",
  "address_bindings" : [ ],
  "switching_profile_ids" : [ {
    "key" : "SwitchSecuritySwitchingProfile",
    "value" : "47ffda0e-035f-4900-83e4-0a2086813ede"
  }, {
    "key" : "SpoofGuardSwitchingProfile",
    "value" : "fad98876-d7ff-11e4-b9d6-1681e6b88ec1"
  }, {
    "key" : "IpDiscoverySwitchingProfile",
    "value" : "64814784-7896-3901-9741-badeff705639"
  }, {
    "key" : "MacManagementSwitchingProfile",
    "value" : "1e7101c8-cfef-415a-9c8c-ce3d8dd078fb"
  }, {
    "key" : "PortMirroringSwitchingProfile",
    "value" : "93b4b7e8-f116-415d-a50c-3364611b5d09"
  }, {
    "key" : "QosSwitchingProfile",
    "value" : "f313290b-eba8-4262-bd93-fab5026e9495"
  } ],
  "ignore_address_bindings" : [ ],
  "internal_id" : "f5dc4a5b-f49f-465b-9832-86151b3670cf",
  "resource_type" : "LogicalPort",
  "id" : "f5dc4a5b-f49f-465b-9832-86151b3670cf",
  "display_name" : "f5dc4a5b-f49f-465b-9832-86151b3670cf",
  "_system_owned" : false,
  "_create_user" : "admin",
  "_create_time" : 1610731219571,
  "_last_modified_user" : "admin",
  "_last_modified_time" : 1610731219571,
  "_protection" : "NOT_PROTECTED",
  "_revision" : 0
}
root@NSXM-01:/var/log/policy#
We are now ready to perform forceful deletion of the Logical Port inside NSX-T database, in the following way ...
root@NSXM-01:/var/log/policy# curl -k -u admin -H "Accept:application/json" -H "Content-Type:application/json"  -X DELETE "https://localhost/api/v1/logical-ports/f5dc4a5b-f49f-465b-9832-86151b3670cf?detach=true"

Removed the blocking object, in our case the Logical Port, the deletion process of the Logical Segment was successfully completed by removing the Segment itself.
It takes a few moments for the deletion process to be completed ... after that, checking into Networking > Segments, the Logical Segment has gone.
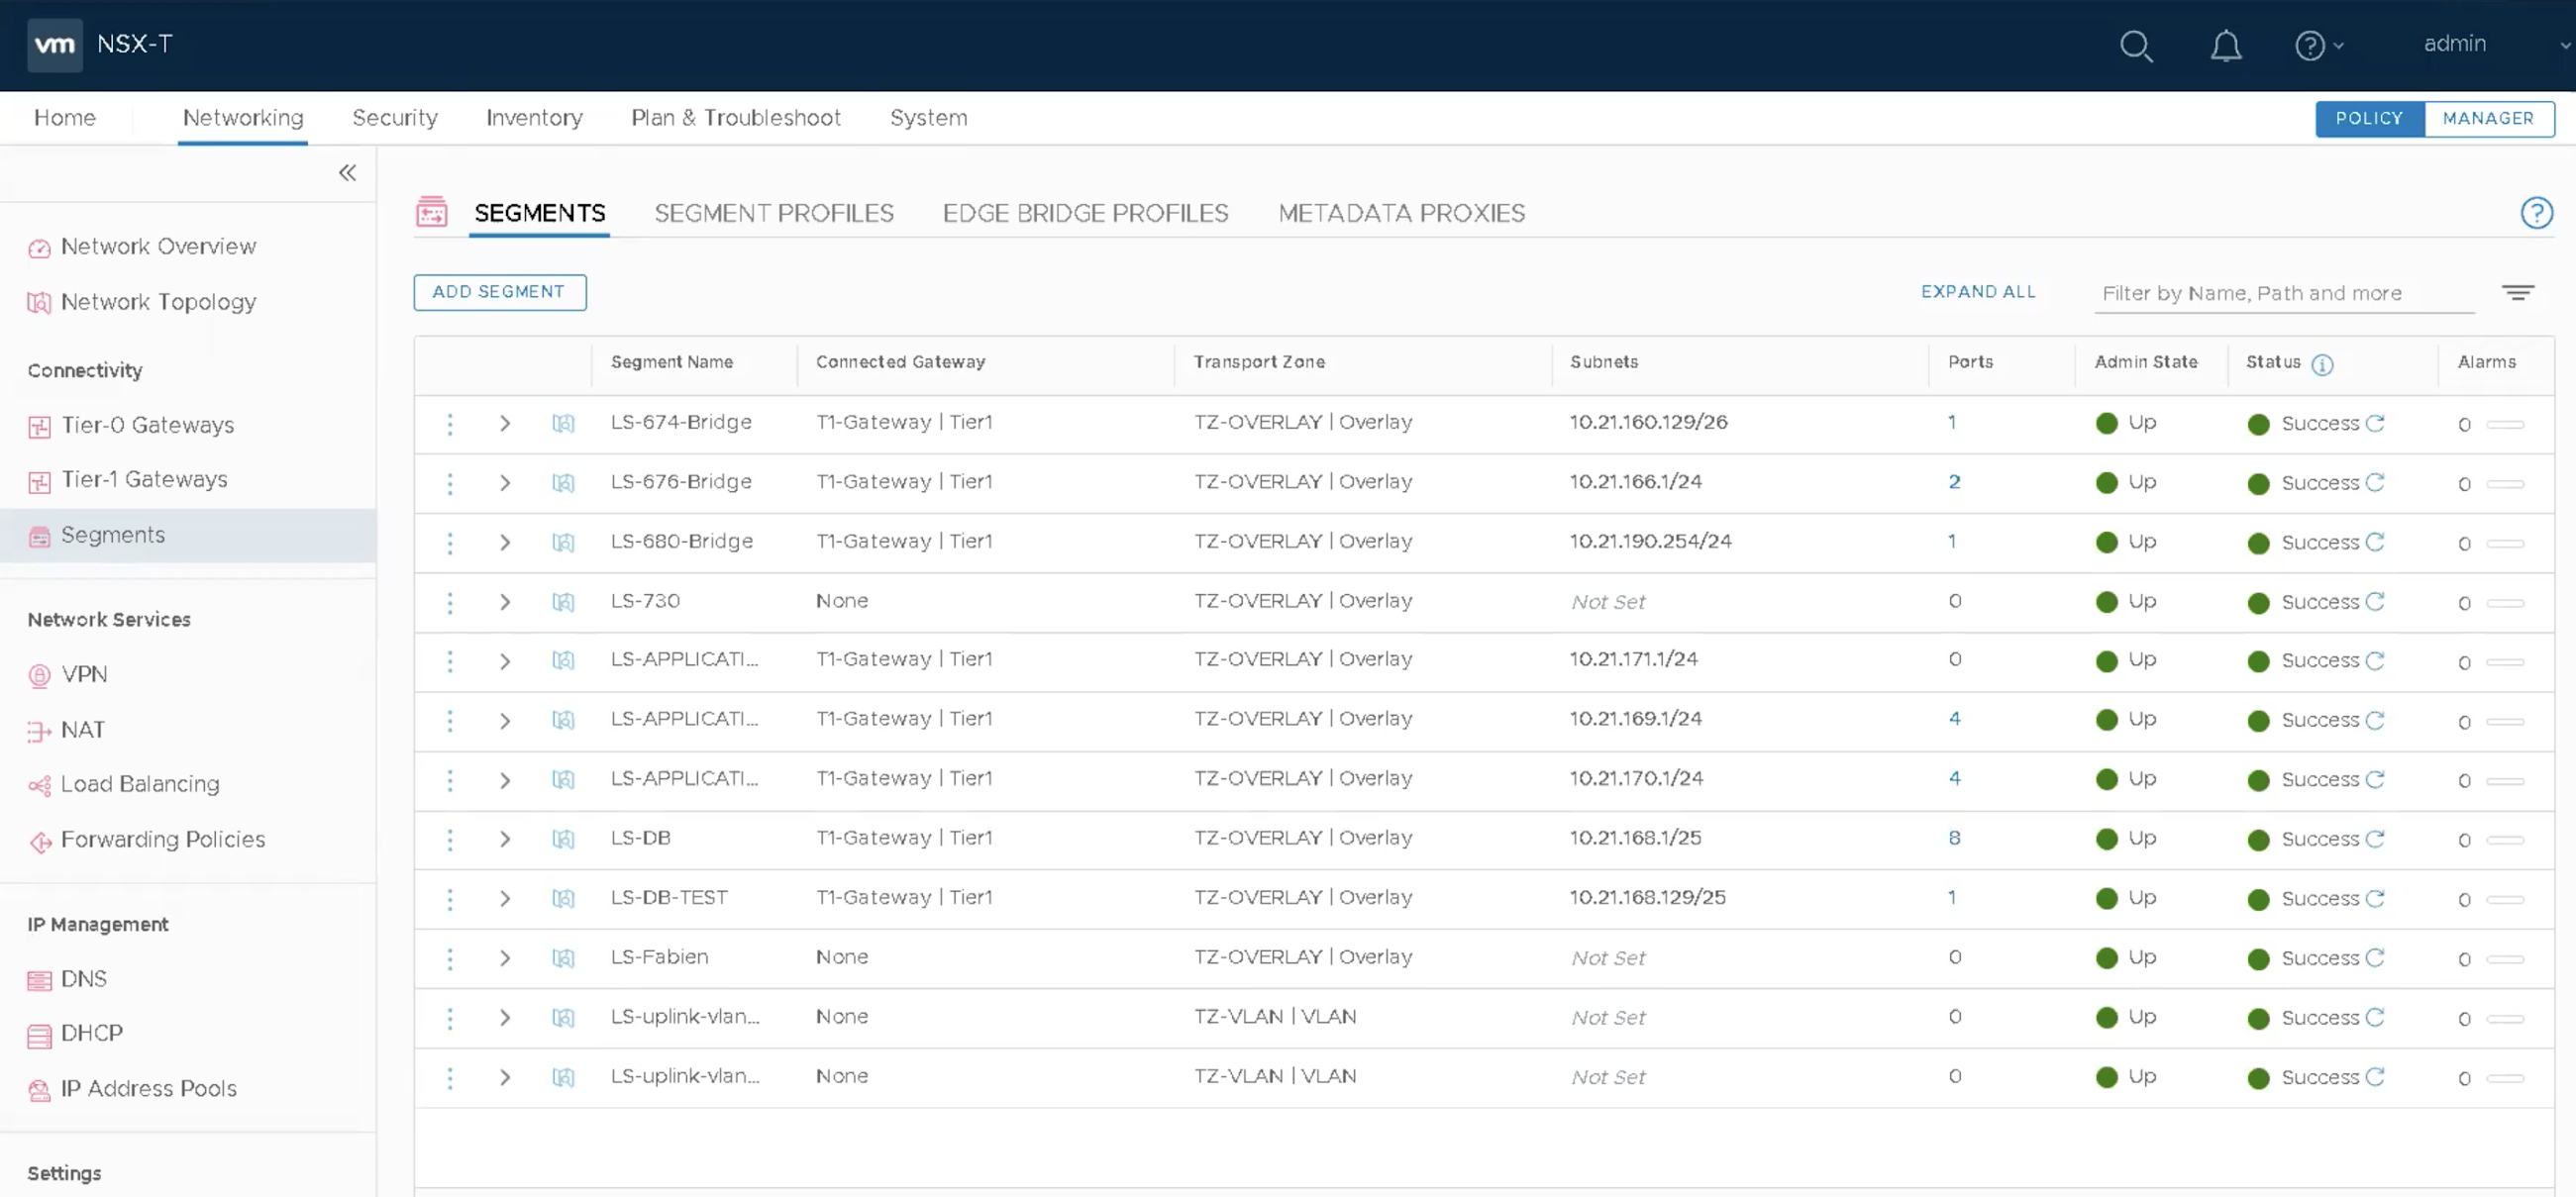
That's it.

venerdì 8 gennaio 2021

VMware NSX for vSphere 6.4.7 not more available to download

Issue
Today I found out, by performing a compatibility check between the various versions of ESXi and NSX to upgrade a customer's farm, that NSX 6.4.7 version due to a serious bug has been removed from download in favor of 6.4.8 (release notes).

" What's New in NSX Data Center for vSphere 6.4.8
VMware NSX for vSphere 6.4.8 resolves a specific issue identified in VMware NSX for vSphere 6.4.7, which could affect both new NSX customers as well as customers upgrading from previous versions of NSX. See Resolved Issues for more information. ”


As you can see from the images below, version 6.4.7 is no longer present from the download ....


... and from the interoperability matrix tables as well.


Solution
It is a good idea to upgrade VMware NSX Data Center for vsphere to version 6.4.8 at least.

That's it.

mercoledì 22 luglio 2020

Change VMNIC name to fit NSX-T Transport Node Profile

Issue
During the design phase of an NSX-T Datacenter implementation, there are a lot of Design Desicions to be addressed and taken, such as the size of the appliances, how many TZ to create, how many Edges (sizing, Active/Active, Active/Standby) .... and so on.

In this design decision I found myself having to consider the following:

  • The customer have many ESXi host clusters to configure with NSX-T where the vmnics that should be used for the creation of the N-VDS are not homogeneous (at the naming convention level). This means, for example, that in a Host-A the vmnic to be used could be named vmnic4 while in a Host-B the vmnic to be associated to the N-VDS could be vmnic9 and so on for other hosts.

  • Second consideration, we are operating in a brown-field environment, where VMs are already up and running.


Well, not having homogeneous vmnic and given the objective need to create a single Transport Node Profile (also applicable to multiple clusters) it was decided to rename the vmnic that will be used/associated with the specific N-VDS in vmnic100 (as showed from the below picture).


As implication for sure we will have to configure each ESXi hosts of the cluster, putting it in maintenance mode (so it to evacuate all running VMs away), rename the vmnic o the vmnics and then restart the system.

Solution
In order to rename/renumbering the vmnics, I found a link to KB article 2091560 that describe how to do this with vSphere 6.x!

So, in our case we want to change the aliases assigned by the ESXi host, for example from vmnic4 to vmnic100, not using Host Profiles but by command line.

Onces gotten the SSH access to the ESXi, from the shell, run the command to see the current assignment of aliases to device locations:

localcli --plugin-dir /usr/lib/vmware/esxcli/int/ deviceInternal alias list
Output


When a nic is controlled by a native driver, then there are actually two aliases associated with the device: a pci alias for the pci device and a logical alias for the uplink logical device.
For each alias that you want to reassign, use the command:

localcli --plugin-dir /usr/lib/vmware/esxcli/int/ deviceInternal alias store --bus-type pci --alias vmnicN --bus-address B

When the logical alias is present, then both the pci alias and logical alias need to be renamed:

localcli --plugin-dir /usr/lib/vmware/esxcli/int/ deviceInternal alias store --bus-type logical --alias vmnicN --bus-address B

where the vmnicN and B are the new assignment that you want to make. For instance, in my case the command is ...

localcli --plugin-dir /usr/lib/vmware/esxcli/int/ deviceInternal alias store --bus-type pci --alias vmnic100 --bus-address s00000002.00


In order the changes take effect it is necessary to perform a clean shut down and reboot the system.

That's it.

lunedì 20 luglio 2020

NIC network Stats

Issue
Today I face out a singular issue, concerning networks micro disconnection and the needs verify information on the physical NICs regarding packet drops and so on ..

Solution
To do that, I wrote a powershell script, available below.
It is enough just replace the variables<VCENTER_FQDN_or_IP> with it's own vCenter (FQDN or IP) references and <CLUSTER_NAME> with the name of the Cluster where the ESXi Hosts are placed.
Connect-VIServer -Server <VCENTER_FQDN_or_IP> 

$hosts = Get-Cluster <CLUSTER_NAME> |Get-VMHost
$Report = @()
foreach($ESXi in $hosts){
  $esxcli = get-vmhost $ESXi | Get-EsxCli
  $nics = $esxcli.network.nic.list.Invoke()
  foreach($pNic in $nics){
               $tempModule=@{}
               $tempModule.Name = $ESXi.name
               $tempModule.NIC_Name =  $pNic.Name
                $tempModule.NIC_Link =  $pNic.Link
                $tempModule.NIC_LinkStatus =  $pNic.LinkStatus
                $tempModule.NIC_Driver =  $pNic.Driver
                $tempModule.NIC_Duplex =  $pNic.Duplex
                $tempModule.NIC_MACAddress =  $pNic.MACAddress
                $tempModule.NIC_MTU =  $pNic.MTU
                $tempModule.NIC_Speed =  $pNic.Speed
 
                $vmnicstats = $esxcli.network.nic.stats.get($pNIC.Name)
                $tempModule.vmnic_Broadcastpacketsreceived =  $vmnicstats.Broadcastpacketsreceived
                $tempModule.vmnic_Broadcastpacketssent =  $vmnicstats.Broadcastpacketssent
                $tempModule.vmnic_Bytesreceived =  $vmnicstats.Bytesreceived
                $tempModule.vmnic_Bytessent =  $vmnicstats.Bytessent
                $tempModule.vmnic_Multicastpacketsreceived =  $vmnicstats.Multicastpacketsreceived
                $tempModule.vmnic_Multicastpacketssent =  $vmnicstats.Multicastpacketssent
                $tempModule.vmnic_Packetsreceived =  $vmnicstats.Packetsreceived
                $tempModule.vmnic_Packetssent =  $vmnicstats.Packetssent
                $tempModule.vmnic_ReceiveCRCerrors =  $vmnicstats.ReceiveCRCerrors
                $tempModule.vmnic_ReceiveFIFOerrors =  $vmnicstats.ReceiveFIFOerrors
                $tempModule.vmnic_Receiveframeerrors =  $vmnicstats.Receiveframeerrors
                $tempModule.vmnic_Receivelengtherrors =  $vmnicstats.Receivelengtherrors
                $tempModule.vmnic_Receivedmissederrors =  $vmnicstats.Receivedmissederrors
                $tempModule.vmnic_Receiveovererrors =  $vmnicstats.Receiveovererrors
                $tempModule.vmnic_Receivepacketsdropped =  $vmnicstats.Receivepacketsdropped
                $tempModule.vmnic_Totalreceiveerrors =  $vmnicstats.Totalreceiveerrors
                $tempModule.vmnic_Totaltransmiterrors =  $vmnicstats.Totaltransmiterrors
                $tempModule.vmnic_TransmitFIFOerrors =  $vmnicstats.TransmitFIFOerrors
                $tempModule.vmnic_Transmitabortederrors =  $vmnicstats.Transmitabortederrors
                $tempModule.vmnic_Transmitcarriererrors =  $vmnicstats.Transmitcarriererrors
                $tempModule.vmnic_Transmitheartbeaterrors =  $vmnicstats.Transmitheartbeaterrors
                $tempModule.vmnic_Transmitpacketsdropped =  $vmnicstats.Transmitpacketsdropped
                $tempModule.vmnic_Transmitwindowerrors =  $vmnicstats.Transmitwindowerrors
               
                $temp = New-Object -TypeName PSObject -Property $tempModule
               $Report += $temp
  }
}
$Report | Select * | Sort-Object -Property Name | Out-Gridview


That's it.

venerdì 12 giugno 2020

NSX-T - How to retrieve TEP IPs by PowerShell

Issue
Today I needed to quickly retrieve all the TEP IPs assigned by NSX-T (from an IP Pool) to the Hosts of a specific ESXi Cluster.

Solution
To do that, I wrote a powershell script, available below.
It is enough just replace the variables<VCENTER_FQDN_or_IP> with it's own vCenter (FQDN or IP) references and <CLUSTER_NAME> with the name of the Cluster where the ESXi Hosts are placed.
Connect-VIServer -Server <VCENTER_FQDN_or_IP> 

$hosts = Get-Cluster <CLUSTER_NAME> |Get-VMHost
$Report = @()
foreach($ESXi in $hosts){
  $tempModule=@{}
  $tempModule.Name = $ESXi.name
  $esxcli = get-vmhost $ESXi | Get-EsxCli
  $IPApp = $esxcli.network.ip.interface.ipv4.get("","vxlan")| Select @{N="IPv4Address";E={$_.IPv4Address}}
  $tempModule.IP = $($IPApp.IPv4Address)
  $temp = New-Object -TypeName PSObject -Property $tempModule
  $Report += $temp
} 
$Report | Select Name,IP | Sort-Object -Property Name | Out-Gridview
The script has been successfully tested on a production environment and on VMware' HOL as it is possible to see below.


That's it.

lunedì 4 maggio 2020

NSX-T Manager: The account specified has been locked

Issue
Today, trying to access via UI to an NSX-T Manager appliance (version 2.5.0) with admin user; I received the following error message:

Your login attempt was not successful.
The username/password combination is incorrect or the account specified has been locked.


.. and even via SSH I had no possibility to log in with the same user.

Solution
I logged in via SSH with the root user and I reset the admin user password by running the following commands:

  • root@nsxmgr-01:/# su admin


  • root@nsxmgr-01> set user admin
    Current password: type OLD password here
    New password: enter new password
    Confirm new password: re-type new password to confim here


Now, trying to get access via UI with admin user again ...


... we are able to get in.


Now, it is also possible to Modifying the Default Admin Password Expiration providing from CLI console the following commands:
  • ... to change the password expiration period for admin user (between 1 and 9999 days).

    nsxcli> set user admin password-expiration <1 - 9999>


  • ... to remove the password expiration policy on any NSX Manager simply typing.

    nsxcli> clear user audit password-expiration


That's it.

lunedì 27 aprile 2020

NSX-T - Error to fetch SSH Fingerprint

Issue
Recently I needed to set up backups of a NSX-T Manager for a one time backup. I have performed the procedures shown in this link: I logged in with admin privileges to an NSX Manager at https://<nsx-manager-ip-address>. Selected System > Backup & Restore then Edit (in the upper right of the page to configure backups) and filled up all forms except the once regarding the SSH fingerprint of the server that stores the backups, because as indicated, I could leave it blank.
Doing so, I received the following error message:

Error while fetching fingerprint of fileserver Algorithm negotiation fail. Possibly, there is no ecdsa and ed25519 support for public keys (Error code: 29259)
- Please retry or provide the fingerprint.


By carefully reading the documentation about the Prerequisites, at the link says:

Verify that you have the SSH fingerprint of the backup file server. Only an SHA256 hashed ECDSA key is accepted as a fingerprint. See Find the SSH Fingerprint of a Remote Server.

Solution
In case was not practicable to follow the instructions suggested in the link, is it possible to get the SSH Fingerprint of a Remote Server through a REST API request. Info about NSX-T Data Center API Guide regarding NSX-T Data Center 2.5.0 can be found here.

So, to fetch the SHA256 fingerprint of the SFTP backup target, in my case, I used the following CURL command:

curl --user admin -H 'Content-Type: application/json' --request POST  https://<nsx-manager-ip-address>/api/v1/cluster/backups?action=retrieve_ssh_fingerprint -k -d '{ "server":"<Target-Backup-IP-Address>","port":22}'

The NSX-T Manager API responds with the SHA256 fingerprint of the SFTP server:


A very great post on configuring and troubleshooting NSX-T SFTP backups, wrote by Gary Hills is available here.


That's it.