mercoledì 30 marzo 2022

NSX-T 3.1.3.6 - Upgrade coordinator, compatibility issue to upgrade to NSX-T 3.2.0.1

Issue


Today, during the upgrade of NSX-T Data Center infrastructure from 3.1.3.6 version to 3.2.0.1 I faced out the following issue.
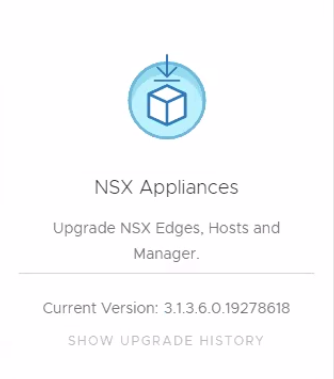
Verifying that everything was correctly in the compatibility matrix, loaded the .mub file I received the following error:

New NSX Upgrade version is not compatible with current NSX version, you cannot upgrade to this version

Solution


Logged into the NSX Manager CLI as root user I checked the upgrade coordinator log files /var/log/upgrade-coordinator/upgrade-coordinator.log, then I noticed the ERROR line:

Error while calling uc_helper for verification of Upgrade bundle VMware-NSX-upgrade-bundle-3.2.0.1.0.19232396.mub. See uc_helper logs

Since the log file of the uc_helper was not present in the appliance manager, I did a google search and found the KB87835 "NSX-T Manager upgrade blocked by Backup passphrase precheck (87835)"

I followed the workaround described into the KB that consist to perform next steps:
  • Download the correct uc_helper file attached to the KB. In my case 3x_to_3201_uc_helper
  • From the NSX-T UI, identify which Manager is orchestrating the upgrade.
    The upgrade UI page is only active on one Manager and this is the orchestrator node.
  • Copy the downloaded 3x_to_3201_uc_helper.py file to /image directory on the orchestrator NSX Manager node.
  • ssh to the orchestrator node as root user.
    If root access is not allowed, ssh as admin and switch to root user with the "st en" command followed by the root user password
  • Backup the file
    cp /opt/vmware/upgrade-coordinator-tomcat/bin/uc_helper.py /opt/vmware/upgrade-coordinator-tomcat/bin/uc_helper.py.bak
  • Perform remediation
    cat /image/3x_to_3201_uc_helper.py > /opt/vmware/upgrade-coordinator-tomcat/bin/uc_helper.py
  • From the NSX-T UI, retry to upload the upgrade .mub file .... and wait.


Now the Bundle file has been loaded successfully and we can continue with the UPGRADE.

That's it.

venerdì 11 febbraio 2022

zsh: no matches found on cURL

Issue


I just came across this issue when I try to make an API request with cURL, like below, from the MAC terminal.

curl -s -k -u "admin.moglie@dtc.local" -X GET https://192.168.20.216/policy/api/v1/infra?filter=Type-

Returning the error:
zsh: no matches found: https://192.168.20.216/policy/api/v1/infra?filter=Type-

It seems that need to escape the question mark, otherwise zsh thinks it is a globbing or wildcard character and tries to find files that match it.

Solution


The solution is to use double or single quote like below:

curl -s -k -u "admin.moglie@dtc.local" -X GET "https://192.168.20.216/policy/api/v1/infra?filter=Type-"

That's it.

venerdì 28 gennaio 2022

Veeam ONE: Impossible to upgrade to version 11 because the upgrade process find unsupported veeam B&R version

Issue


A customer of mine fails to update Veeam ONE from version 10.0.0.750 to the latest version 11. He encounter the following error message "Veeam ONE database has one or more unsupported Veeam Backup & Replication servers. This product supports Veeam Backup & Replication 9.5 Update 4 or later."


Solution


I tried to see if there were any objects or configurations prior to version 9.5 but I didn't find anything.
The problem encountered may occur when the VBR server, added to Veeam ONE was upgraded before the Veeam ONE upgrade, so automatic upgrade is not possible.
Anyway, there is a workaround for this situation, suggested by veeam support. Is a manual product update.
To solve, follow the instructions below:

1. Make a backup of Veeam ONE database: https://www.veeam.com/kb1471 and then uninstall Veeam ONE on the server completely.

2. Install Veeam ONE v11a with the local database (SQL server express will be installed on the server)

3. After the installation, execute the script from the folder: ISO: Addins\SQLScript\VeeamOne.sql. against the existing Veeam ONE database (on the production SQL server: https://www.veeam.com/kb2312 )

4. Once the script is executed, change the database name in Veeam ONE settings and restart the services as described in the following article: https://www.veeam.com/kb1592

Thanks, to the guys at veeam support.

That's it.

giovedì 13 gennaio 2022

Just a cosmetic issue?? No, PortGroup and Uplink disconnected (on UI) not properly re-assigned after upgrade.

Issue


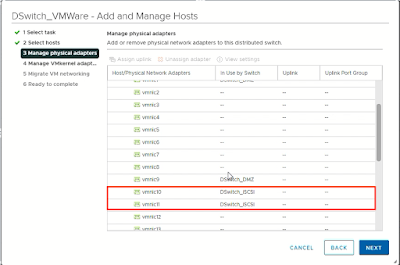
After an upgrade of the ESXi host from version 7.0.1 to 7.0.2 when the host came back on, the network was no longer properly connected to the DVS.
I then re-added the ESXi host to the various DVSs by reassigning the uplinks to the correct vmnic as originally.
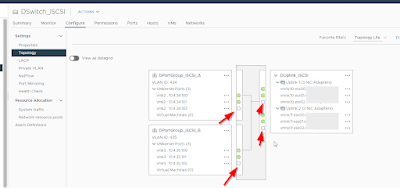
Everything seemed to be working fine (ping, VMs were reachable, the host was properly managed by vCenter, vMotion was OK, then the host was able to mount iSCSI storage correctly etc) when I noticed ...
and ...

Solution


To solve the problem I had to re-assign the VMkernel adapters to the corresponding Portgroup even if they were already present.

So, I proceeded as follows ..
  • Right click with the mouse on DVS affected (The images below refer to a different DVS from that shown by the images above, however the procedure performed does not change).
  • Add and Manage Hosts...
  • Select Manage host networking and click Next
  • Click on Attached Hosts... select the host affected. Click OK and then Next until you get to session 4 Manage VMkernel adapter.
  • Select the vmk of the "On this switch" section (in my case, I start with vmk0 and then with the others) and click Assign portgroup.
  • Select the right portgroup and clik OK.
  • Do the same for the others vmks.
  • Click NEXT, NEXT and then FINISH.
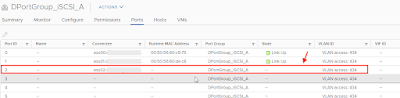
  • As we can see now, from the image below a new "Port ID" has been assigned to the host and the "State" results with the Link Up.
  • But if I look into the Topology view, there is still something to fix ...

    the Uplink1 and Uplink2 State for the host are still down ...
  • Connecting via SSH to the host, I check the status of the nic with the command

    # esxcli network nic list

    I observe, that unlike the graphical interface, the "Link Status" of vmnic20 and vmnic21 are Up.
  • I solved it, putting down and up the vmnic20 and vmnic21 ...

    # esxcli network nic down -n vmnic20
    # esxcli network nic up -n vmnic20
  • Looking the UI ...
    Now everything is OK.

That's it.

lunedì 30 agosto 2021

NSX-T Data Center EDGE does not start correctly

Issue


After some failover attempts performed on the EDGEs, following some laboratory tests, I found myself in the situation where the EDGE is no longer able to boot properly due to file system problems.

Failed to start File System Check on /dev/mapper/nsx-var+dump.
See 'systemctl status "systemd-fsck@dev\\x2dvar\\x2bdump.service"' for details.


Solution


Disclaimer: Procedures described below may not be officially supported by VMware. Use it at your own risk. Before to perform any action described be sure that you have a valid backup. The best way is to open a Service Request to the VMware GSS.

We performed the command below as suggested, then ...

systemctl status "systemd-fsck@dev\\x2dvar\\x2bdump.service"
.. we performed check of the file system ...

fsck -y /dev/mapper/nsx-var+dump
reboot
After the reboot, the Edge has started normally.

That's it.

giovedì 12 agosto 2021

If service is unavailable .... put into maintenance mode the EDGE..

Issue


I was recently asked to create a script, for monitoring by ping a specific service/IP .... and in the event of a fault for three consecutive times to take actions on NSX-T.
In my case, the action to be taken in NSX-T was to put a specific EDGE into maintenance.

Solution


First of all, what we want to realize is a bash script to run on a linux machine ... but, we also need to find out how to retrieve the NSX-T information we need via the REST API.
Let's start finding out how to retrieve information we need from the NSX-T Data Center REST API web site.
Having a linux environment available, my REST API calls will be executed using the curl command. Most API calls require authentication. NSX-T Data Center API supports several different authentication schemes, which are documented in link above. Multiple authentication schemes may not be used concurrently.

For our purpose is enough to use the Basic encoded Authentication. To do this, we modify the following call:
curl -k -u 'admin:VMware1!VMware1!' https://<nsx-mgr>/api/v1/logical-ports
in the

curl -k -H "Authorization: Basic YWRtaW46Vk13YXJlMSFWTXdhcmUxIQ==" https://<nsx-mgr>/api/v1/logical-ports
To encode the string 'admin:VMware1!VMware1!' it's enough execute, on a linux machine the command

echo -n 'admin:VMware1!VMware1!' | base64
Now, we need to retrieve the proper information regarding the EDGE (in my case "edge01a") we want to collect; executing the following command:

curl -k -H "Authorization: Basic YWRtaW46Vk13YXJlMSFWTXdhcmUxIQ==" https://<nsx-mgr>/api/v1/transport-nodes
From the outcome let's look for the display name row with the edge name (in my case edge01a as shown below) and take note of the identifier "id" indicated in the line above ("id": "32340c58-6f28-412c-9f75-c455f8d11323").

If we run the modified command as below, we get detailed information about the edge.

curl -k -H "Authorization: Basic YWRtaW46Vk13YXJlMSFWTXdhcmUxIQ==" https://<nsx-mgr>/api/v1/transport-nodes/32340c58-6f28-412c-9f75-c455f8d11323


Now we have collected all the information we need we can create the bash script as the following
#!/bin/bash
#
# Author: Lorenzo Moglie (ver.1.0 28.05.2021)
#
# IP = Active Service/IP that we want monitoring by pinging every $sleeptime (in seconds). 
#      After 3 unsuccessful attempts it performs (in our case) the failover forcing the maintenance of the EDGE (edge01a)
# sleeptime = can be set (below), time between one ping and the next by default is 1
# NSX = NSX-T Manager on which we want to launch the command
# WARNING : NSX-T Parameters to use in Basic Authorization according to your own needs, in my case:
#           Username = admin
#           Password = Vmware1!VMware1!
#           EDGE ID must be found earlier in my case 32340c58-6f28-412c-9f75-c455f8d11323
#

IP='<IP>'
sleeptime=1
NSX='<nsx-mgr>'

NPing=0
while true; do
 if [ "$NPing" -eq 3 ] 
 then
   NPing=0
   curl -k -X POST -H "Authorization: Basic YWRtaW46Vk13YXJlMSFWTXdhcmUxIQ=="  https://$NSX/api/v1/transport-nodes/32340c58-6f28-412c-9f75-c455f8d11323?action=enter_maintenance_mode
 else
 fi
 ping -c1 $IP 2>/dev/null 1>/dev/null
 if [ "$?" = 0 ]
 then
  NPing=0
  echo "OK"
 else
  echo "Failure $NPing"
  NPing=`expr $NPing + 1`
 fi
 sleep $sleeptime
done 
let's see how the script it works below...... as soon as the IP become unreachable .... after three failed attempts.. send the command to put into maintenance mode the edge.

That's it.

How to set by script a new unique UUID.bios

Issue


A colleague of mine asked me help with creating a powershell script, to change the UUID.bios value in the .vmx file due to a problem related to VMs restored from backups with the same UUID. The issue is related to the fact that both VMs (source and recovered) with the same UUID.bios are present on the execution environment at the same time.

Solution


Googling around I found an old thread on the VMNT community answered by Luc Dekens.
There are several ways of doing in it, from manual to programmatic (as can be seen in this KB article)

I've chosen to write a PowerCLI script. So, I took the Luc's code (thanks for sharing with the community) and readjusted for my needs as described below.
The steps to follow are:
  • shutdown the VM
  • get the current UUID
  • change the UUID (with one autogenerated)
  • power on the VM

The new UUID is generated by a static prefix plus the date in the format Year, Month, Day, Hours, Minutes, Seconds, where first 2 digits are taken for all of them (example Get-Date -UFormat "%y%m%d%H%M%S").
############################################################################################
#
#  File  : Change-UUID.BIOS.ps1
#  Author: Lorenzo Moglie
#  Date  : 12.08.2021
#  Description : This script disconnect can be used for generate a new UUID for the target VM
#
#  Usage: .\Change-UUID.BIOS.ps1 <vm-name>
#
############################################################################################

if ($args[0].length -gt 0) {
 $vmName = $args[0]
} else {
 Write-Host -ForegroundColor red "Usage: .\Change-UUID.BIOS.ps1 <VM Name>"
 exit 40
}


Connect-VIServer -Server <VCENTER> -User <USERNAME> -Password <PASSWORD>

$vm = Get-VM -Name $vmName
#Write-Host OLD.UUID=$($vm.extensiondata.config.uuid)

if ((Get-VM -Name $vmName).PowerState -eq "PoweredOff") {
  Write-Host -foreground Green "- VM"$vmName "is already OFF"
}
else
{
    Write-Host -foreground Red "- VM"$vmName "is shutting down ..." 
    $vm | Shutdown-VMGuest  -Confirm:$false
    While ((Get-VM -Name $vmName).PowerState -ne "PoweredOff") {
        Write-Host -foreground yellow "... waiting for" $vmName "to power off"
    sleep 5
    }
}

$newUuid = "6d6f676c-6965-6c31-2e30-" + $(Get-Date -UFormat "%y%m%d%H%M%S")

$spec = New-Object VMware.Vim.VirtualMachineConfigSpec
$spec.uuid = $newUuid
$vm.Extensiondata.ReconfigVM_Task($spec)

Write-Host -foreground Green "- VM"$vmName "successfully updated."
Write-Host "OLD.UUID="$($vm.extensiondata.config.uuid)
Write-Host "NEW.UUID="$newUuid

Write-Host -foreground Green "- VM"$vmName": Restarting in progress ...."
Start-VM -VM $vm -RunAsync 

Disconnect-VIServer -Server * -Force -Confirm:$false

let's see below how the outcome looks like ...

a double check.

UUID.BIOS changed ... Everything look fine.

That's it.