This post comes from this request asked to the vCommunity. Essentially, he/she wonder understand if is it possible to move the primary NSX manager role within a Cross-vCenter implementation.
The answer is "YES" and is written here in "How Cross-vCenter NSX Works". If you change the role of a primary NSX Manager to standalone and any universal objects exist in the NSX environment, the NSX Manager will be assigned the transit role. The universal objects remain, but they cannot be changed, and no other universal objects can be created. You can delete universal objects from the transit role. The transit role should only be used temporarily, for example, when changing which NSX Manager is the primary.
Briefly the steps are:
But, let's covering the process down here in detail, step by step, with screenshots. To do so, I used the HOL-1925-01-NET provided from VMware.
First of all, a quick check on Primary and Secondary NSX Managers that "Segment IDs" doesn't overlap. In our case we have only one primary and one secondary, we don't have more than one secondary NSX Manager.


... and that "Universal Segment ID Pool" must be the same cross-vCenter (in our case "10000-10999" as shown above).
I created two new objects (in our case Logical Switch), the first one "LM_local" assigned to local transport zone and second one "LM_Universal" assigned to a Universal Transport Zone (that span across vCenters); just to be sure that everything works fine.

the result is ...

Perform a "Universal Synchronization" from the Primary NSX Manager (192.168.110.42)


Select the Primary NSX Manager and Remove Primary role (Now all NSX manager change in Transit Mode)


Now switch on "NSX Controller Nodes" and clean up (deleting) all the controllers.


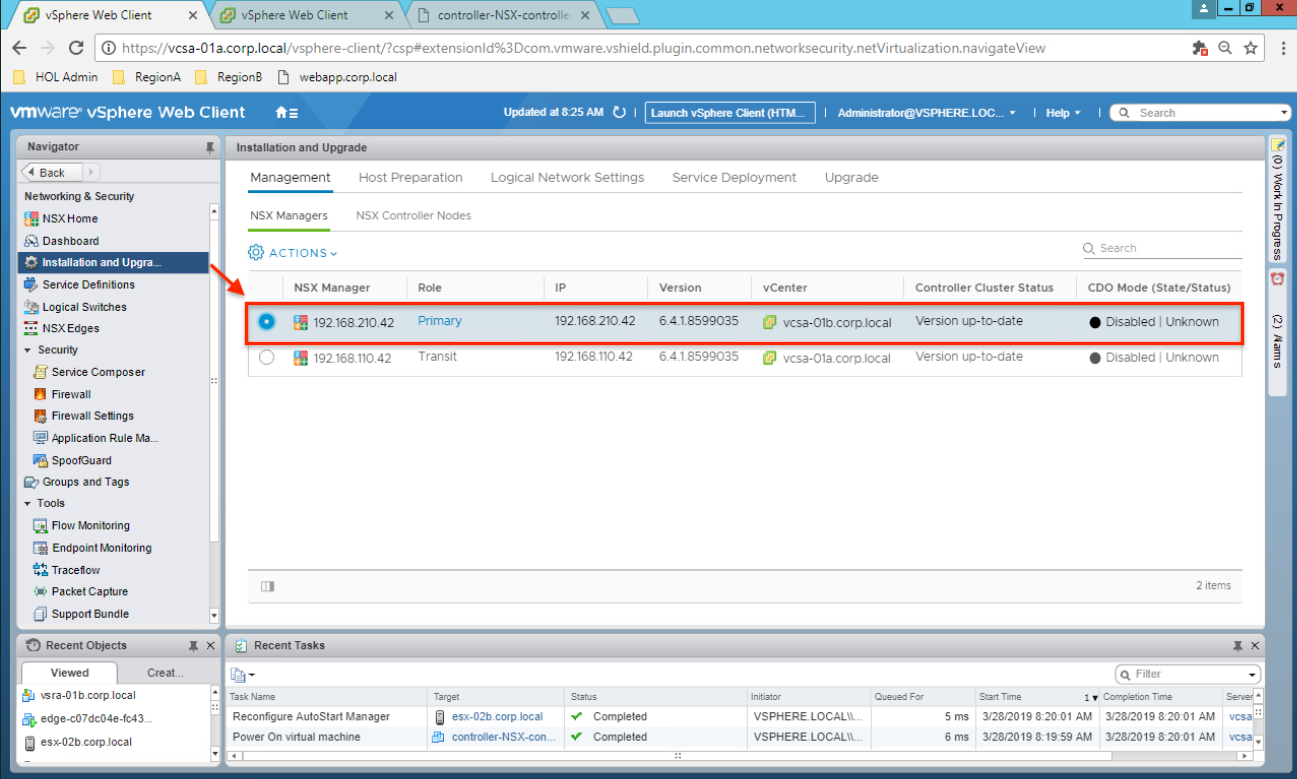
Then switch back to the tab "NSX Managers" and select the New NSX Manager that you want to become Primary (in our case 192.168.210.42) and Assign the Primary Role.


Create new Controllers assigned to the New Primary NSX Manager (192.168.210.42)


When correctly deployed.... switch back to the tab "NSX Managers"
Select the New Primary NSX Manager and -> Actions -> Add Secondary Manager (192.168.110.42) and proceed accepting the certificate until the end.


Repeat for the others NSX Manager .....
Verify that the Communication Channel is healthy

If the "Communication Channel Health" is not green wait few second .... or try to force the communication ... and everything will go UP


Let's check the Logical Switch previously created and, as aspected, we can see that the "LM_Universal" is present on the new Primary as Universal Object and that "LM_local" is present only locally on the new Secondary NSX Manager.


Now to verify that everything is working fine, let's create a new universal object, of course must be created on the Primary NSX Manager and we verify that will be properly propagated on the Secondary as well.


That's it.
The answer is "YES" and is written here in "How Cross-vCenter NSX Works". If you change the role of a primary NSX Manager to standalone and any universal objects exist in the NSX environment, the NSX Manager will be assigned the transit role. The universal objects remain, but they cannot be changed, and no other universal objects can be created. You can delete universal objects from the transit role. The transit role should only be used temporarily, for example, when changing which NSX Manager is the primary.
Briefly the steps are:
- Perform a Backup of the all NSX Managers you have deployed into your environment
- Perform Universal Synchronization (before doing any action)
- Select the Primary NSX Manager and Remove Primary role (Now all NSX manager change in Transit Mode)
- Now switch on "NSX Controller Nodes" and clean up (deleting) all the controllers.
- Then switch back to the tab "NSX Managers" and select the New NSX Manager that you want to become Primary and Assign the Primary Role.
- Create new Controllers assigned to the New Primary NSX Manager
- When correctly deployed.... switch back to the tab "NSX Managers"
- Select the New Primary NSX Manager and -> Actions -> Add Secondary Manager (Proceed accepting the certificate until the end)
- Repeat for the others NSX Manager .....
- Verify that the Communication Channel is healty
But, let's covering the process down here in detail, step by step, with screenshots. To do so, I used the HOL-1925-01-NET provided from VMware.
First of all, a quick check on Primary and Secondary NSX Managers that "Segment IDs" doesn't overlap. In our case we have only one primary and one secondary, we don't have more than one secondary NSX Manager.


... and that "Universal Segment ID Pool" must be the same cross-vCenter (in our case "10000-10999" as shown above).
I created two new objects (in our case Logical Switch), the first one "LM_local" assigned to local transport zone and second one "LM_Universal" assigned to a Universal Transport Zone (that span across vCenters); just to be sure that everything works fine.

the result is ...

Perform a "Universal Synchronization" from the Primary NSX Manager (192.168.110.42)


Select the Primary NSX Manager and Remove Primary role (Now all NSX manager change in Transit Mode)


Now switch on "NSX Controller Nodes" and clean up (deleting) all the controllers.


Then switch back to the tab "NSX Managers" and select the New NSX Manager that you want to become Primary (in our case 192.168.210.42) and Assign the Primary Role.


Create new Controllers assigned to the New Primary NSX Manager (192.168.210.42)


When correctly deployed.... switch back to the tab "NSX Managers"
Select the New Primary NSX Manager and -> Actions -> Add Secondary Manager (192.168.110.42) and proceed accepting the certificate until the end.


Repeat for the others NSX Manager .....
Verify that the Communication Channel is healthy

If the "Communication Channel Health" is not green wait few second .... or try to force the communication ... and everything will go UP


Let's check the Logical Switch previously created and, as aspected, we can see that the "LM_Universal" is present on the new Primary as Universal Object and that "LM_local" is present only locally on the new Secondary NSX Manager.


Now to verify that everything is working fine, let's create a new universal object, of course must be created on the Primary NSX Manager and we verify that will be properly propagated on the Secondary as well.


That's it.


