mercoledì 18 marzo 2020

VEEAM - Invalid Remote Certificate – Veeam Backup & Replication

Issue
Recently, following an update of the VMware infrastructure to the latest 6.7 P01 (build number 15160138), all backup jobs on some servers, already present in the inventory in stand alone mode, have failed with the error message:

"Disk and volumes discovery failed Error: The remote certificate is invalid according to the validation procedure."

.... as shown in the picture below.


As first attempt I went to the INVENTORY then in Standalone Hosts right click on the Host affected and tried to Refresh informations already kept on the Veeam Manager.....


after a while I faced out the message:

Failed to login to "" by SOAP, port 443, user "root", proxy srv: port:0
The underlying connection was closed: Could not establish trust relationship for the SSL/TLS secure channel.
The remote certificate is invalid according to the validation procedure.


Solution
Here is a quick fix for it.
  • Open the Veeam Backup & Replication Console.
  • Select Backup Infrastructure.
  • Select Managed Servers.


  • Right click on the Server with the issue and select Properties...


  • In the Edit VMware Server screen Name.
    Leave DNS Name or IP address and Description unchanged clicking Next.


  • You should not to change anything in the tab Credential as well and click Apply.


  • You will get an error about the certificate and be asked if you want to continue anyway.


    Before continuing, check the certificate by clicking on View... and then OK and Continue


  • Review summary information and continue the process saving the server configuration clicking Finish.


  • Go back on the Standalone Hosts in the INVENTORY and select the host affected; now you should be able to see again the list of the VMs ....


  • Let's try to re-run the backup job by selecting "Retry" or "Start"


  • This should clear the error and the backup job should run now as before!!!


That's it!

DataDomain - Upgrade by command line

Issue
Today I had to update the firmware of a DataDomain 3300 to the latest version 7.1.0.10-646016, however, there is an issue that prevents you from updating from the GUI ...


Solution

  1. First of all we should download locally the firmware .rpm file from the DellEMC support site. In our case we have to download the 7.1.0.10-646016.rpm file.

  2. Then we must copy the .rpm file into a specific path "/ddr/var/releases".

    scp 7.1.0.10-646016.rpm sysadmin@dd3300:/ddr/var/releases/

  3. Got access the Data Domain appliance via SSH, we proceed giving the pre-check command ...

    sysadmin@dd3300# system upgrade precheck 7.1.0.10-646016.rpm

  4. If no issues were found, we go ahead starting the upgrade ...

    sysadmin@dd3300# system upgrade start 7.1.0.10-646016.rpm

    and then typing "yes" and enter.


  5. System will reboot automatically...


  6. When the appliance become reachable again, gained access by ssh, we can check the status of the upgrade with the command ..

    sysadmin@dd3300# system upgrade status


    To be sure that the upgrade is completed successfully, we have to wait the message (as shown below in the picture):
    Current Upgrade Status: DD OS upgrade Succeeded


  7. We can now get access to the DataDomain Appliance by the GUI

That's it.

Notes: The information and some links provided in this article may be confidential and owned by DellEMC, accessible only after authentication on the DellEMC website.
Further information available at https://emcservice.force.com/CustomersPartners/kA23a000000GI38CAG

giovedì 12 marzo 2020

VEEAM v10 - indexing and application-aware processing not more supported on Guest OS Windows 2003

Issue
Last week I have updated a Veeam Backup & Replication infrastructure version 9.5U4 to version 10. With the release of new version 10, veeam has dropped support for guest processing of Windows XP and Windows Server 2003.
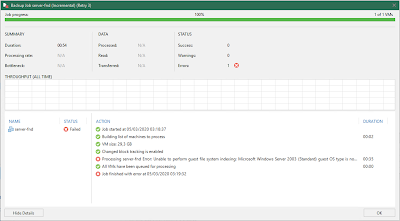
It is therefore possible to have backup jobs that refer to guest Windows XP or Windows Server 2003 with application-aware processing and indexing enabled that must be updated by disabling the application-aware processing and the guest file system indexing (as shown in the picture below);


otherwise the following error messages are obtained:

05/03/2020 02:57:06 :: Error: Unable to perform guest file system indexing: Microsoft Windows Server 2003 (Standard) guest OS type is not supported for indexing.

05/03/2020 04:49:37 :: Error: Unable to perform guest file system indexing: Microsoft Windows Server 2003 (Standard) guest OS type is not supported for indexing.


05/03/2020 10:51:18 :: Processing server-fnd Error: Unable to perform application-aware processing: Microsoft Windows Server 2003 (Standard) guest OS is not supported


and as a result the failure of the backup job.


It's really important before to upgrade to Veeam Backup & Replication v10 read carefully Veeam Backup & Replication 10 Release Notes, any requirement regarding Platform Support and be aware on what is or what is not supported with new version.


That's it.

lunedì 9 marzo 2020

VMs Memory information

Problem
I need a fast way to check the Memory usage of the last 30 days to understand if there are more RAMs than needed in the VMs.

Solution
Below a very simple PowerCLI script that will return information about Minimum, Maximum and Avarage Memory of the last 30 days.
First of all, after you have opened a powershell terminal (doesn't mind if Windows/Linux/MacOS), you need to connect to the vCenter Server, providing a proper User and Password:

Connect-VIServer -Server “IP/hostname/FQDN”
Once connected you can execute the following command:

$Report = @()
foreach ($VM in Get-VM) {
  $vmstat=@{}
 $vmstat.VMname = $vm.Name     
 $statmem = Get-Stat -Entity ($vm)-start (get-date).AddDays(-30) -Finish (get-date).AddDays(-1) -MaxSamples 10000 -stat mem.usage.average
 $mem = $statmem | Measure-Object -Property value -Average -Maximum -Minimum
 $vmstat.MemMax = [math]::round($mem.Maximum,2)
 $vmstat.MemAvg = [math]::round($mem.Average,2)
 $vmstat.MemMin = [math]::round($mem.Minimum,2)
 $temp = New-Object -TypeName PSObject -Property $vmstat
    $Report += $temp
} 
$Report | Select VMname, MemMax, MemAvg, MemMin | Format-Table -AutoSize 


That's it.

venerdì 6 marzo 2020

VEEAM - Configure a NAS backup Job

New capabilities that redefine NAS data protection to deal with the world of massive file data, have been released with the new veeam v10 version.
Below I will covering step by step how to setup and configure on Veeam 10 to backup file from a NAS file share.
First of all let's see the official documentation available here, to understand which components must be present or added to the backup infrastructure and to understand "How File Share Backup Works".

Before to begin to adding an SMB file share to the inventory of the virtual infrastructure is possible to check prerequisites, limitations and the official procedures here.

To add an SMB file share, once opened Veeam Backup and Replication console proceed as follows:
  • Open the Inventory view.

    Click on File Shares and then ADD FILE SHARE.


  • Click SMB share (in my case I have a NAS that run a CIFS service)


  • In the Shared folder field, specify the path to an SMB file share in the \\server\folder format.

    Select the This share requires access credentials check box and provide proper credentials to get full access control to shared folder.


  • Clicking on Advanced the window shows several options.

    Leave the enabled the default option "Backup directly from the file share" clicking on OK and then click Next >.


  • Click Choose... next to the File proxy field to select a file proxy.

    From the Cache repository drop-down list, select a cache repository where temporary cache files must be stored.

    Use the Backup I/O control slider to define how fast all proxies can read data from the source file share.

    Click Apply to save the configured settings.


  • Wait while required components are installed and configured, then click Next>.


  • At the Summary step, reviewed the configuration, click Finish to finalize the setup and exit the wizard.


In the following steps we will see how to set up a backup job of the NAS file share content.

  • Open the Inventory view.

    Right click on SMB file share select Add to backup job and then click on New job...


  • In the Name field, specify the name of the backup job and click Next >.


  • Select File or folder and click Add...


  • Explore Folders, select which ones you prefer and click OK.


  • In Advanced is possible to create extension masks to Include or Exclude files.


  • Select the desired Backup repository.

    Use the Keep all file versions for the last field to define short-term retention policy: specify how long copies of all recent file versions must be kept in the short-term backup repository.

    Click Next >.


  • Add a Secondary Target otherwise click Next >.


  • Schedule the job to run automatically.


  • Review details and click Finish.


  • The job run as expected.


That's it.


Further info: v10: Seriously Powerful NAS Backup at Scale

mercoledì 4 marzo 2020

Personal goals for 2020 about the Blog.

In this year 2020 my personal goals regarding the evolution of the blog (born as a personal collection point of information, scripts, issues, daily problems that have happened to me, how I have solved them and so on, to be shared with users of the web) is obviously to continue writing on VMware but also, to posts some articles on two brands with which I work daily (or almost) like Pure Storage and Veeam.


We will see next year if I succeeded in my intent ... :)

martedì 3 marzo 2020

VM Hardware and Tools Status,Version

Problem
I need to check and compare for each Virtual Machine the version of the Virtual Hardware, the Status and the Version of the VMware Tools.

Solution
The easiest way I've found is to make some a simple script like the following via PowerCLI.

$Report = @()
foreach ($VM in Get-VM) {
  $vmHW=@{} 
 $temp = Get-View $VM |  Select Name, @{N="HWVersion";E={$_.Config.version}},  @{N='VMwareToosStatus';E={$_.Guest.ToolsStatus}}, @{N="VMwareToolsVersion";E={$_.Config.Tools.ToolsVersion}}
 $vmHW.VMname = $temp.Name
 $vmHW.HWVersion = $temp.HWVersion
 $vmHW.VMwareToosStatus = $temp.VMwareToosStatus
 $vmHW.VMwareToolsVersion = $temp.VMwareToolsVersion
 $tempNObject = New-Object -TypeName PSObject -Property $vmHW
    $Report += $tempNObject
} 
$Report | Select @{N="VM Name";E={$_.VMname}}, @{N="HW Version";E={$_.HWVersion}},  @{N='VMware Tools Status';E={$_.VMwareToosStatus}}, @{N="VMware Tools version";E={$_.VMwareToolsVersion}}  | Sort-Object -Unique "VM Name" | Format-Table -AutoSize 


That's it.