giovedì 29 dicembre 2022

Edge VM Present In NSX Inventory Not Present In vCenter

Issue


A customer writes me an email asking for help because two Edge nodes in his NSX-T infrastructure had the following critical error (as shown in the picture below):

"Edge VM Present In NSX Inventory Not Present In vCenter"

Solution


This error message, as we can see from the this link was introduced in version 3.2.1.
The customer has already tried to verify what is indicated in the "Recommended Action" and found that the vm-id is not modified, and the Edge VMs are still in the vCenter Inventory.
Asking if he had made any changes, he replies that the only change made was at the vCenter level to update the expired Machine Cert, and that the certificate was revalidated by NSX-T (indeed the communication between the NSX-T system and the vCenter was showing no errors).
In summary, the Edge VMs were still in inventory, nobody had changed the vm-id, the only thing that had changed was the certificate in vCenter.

The customer fixed it himself on the first attempt, by restarting the cluster appliance the VIP was pointing to. By doing so, when the VIP was switched to another appliance of the NSX Manager cluster, the message resolved itself.

As a second attempt, if the first didn't work, after verifying correctly what is indicated in the "Recommended actions" would be to "Redeploy an NSX Edge VM Appliance" if the edge is no longer connected to NSX Manager; otherwise to replace it inside the Cluster (one by one) as indicated in "Replace an NSX Edge Transport Node Using the NSX Manager UI"

That's it.

martedì 11 ottobre 2022

MacOS - Running Scripts at Login

Issue


In October 2018 I wrote a short post (in Italian) on how to "Remapping Keys in MacOS".
In the post I also wrote that I would publish a second one on how to make this change permanent. For reasons of time (few time available), work, family, etc. I never managed to write it until I forgot about it. Then thanks to Paolo's comment I remembered that I have not posted it anymore. So, I do it now.

Solution


To solve this issue, and make the fix permanent every time I login into my account I decided to use the LaunchAgent features.
More information about LaunchAgent can be found in "Daemons and Services Programming Guide" and in "Script management with launchd in Terminal on Mac" as well.

Let's see below how to run the script when our user logon.
  1. Let's start, creating the folder where to place the script to run. In my case I decide to create a new ".lm_scripts" (hidden folder) under my own directory.
  2. Create a script similar to the followingg, and place it under the new directory (in my case .lm_scrpts).
    For a complete reading on how to find the various parameters, refer to my original post
    #!/bin/bash 
        
     hidutil property --matching '{"ProductID":0x221,"VendorID":0x5ac}' --set '{"UserKeyMapping":[{"HIDKeyboardModifierMappingSrc":0x700000063,"HIDKeyboardModifierMappingDst":0x700000037}]}'
  3. Give the script executable permissions
    chmod +x remapping.keys.sh
  4. Create with your favourite editor a new .plist file. I called it com.remapping.keys.plist
    As shown below
    <?xml version="1.0" encoding="UTF-8"?>
    <!DOCTYPE plist PUBLIC "-//Apple//DTD PLIST 1.0//EN" "http://www.apple.com/DTDs/PropertyList-1.0.dtd">
    <plist version="1.0">
        <dict>
            <key>Label</key>
            <string>com.remapping.keys.app</string>
            <key>Program</key>
            <string>/Users/lorenzo/.lm_scripts/remapping.keys.sh</string>
            <key>RunAtLoad</key>
            <true/>
        </dict>
    </plist>
    Note that, the program string above must reflect your user and the path where the script remapping.keys.sh is present.

  5. Then, place the file, in my case com.remapping.keys.plist (just created) under the following directory ~/Library/LaunchAgents/

Now, at your next login the keys of the keyboard keys will be re-mapped as desired.

That's it.

lunedì 25 luglio 2022

Clone a VM via PowerCLI

Issue


What I need today? I just need to create a simple PowerCLI script to clone a VM, after it has been powered off.

Solution


Disclaimer: Use it at your own risk.

The following script is used to create a clone of a specific VM (after it has been shut down).
Before running, replace the following fields with your information:

<VCENTER>: Source vCenter (where the VM is running)
<USERNAME>: Username to connect to the vCenter (whit right permition to clone)
<PASSWORD>: Password of the user
<DATASTORE_TARGET>: Datastore target where. to place the cloned VM

Below the script:
##############################################
# LM: Use it at your own risk
# Clone a VM on the specific Datastore and attach the suffix "_Clone" to the VM Name (cloned)
##############################################

if ($args[0].length -gt 0) {
 $vmName = $args[0]
} else {
 Write-Host -ForegroundColor red "Usage: .\CloneVM.ps1 <VM_Name>"
 exit 40
}

Connect-VIServer -Server <VCENTER> -User <USERNAME> -Password <PASSWORD>

$vm = Get-VM -Name $vmName

if ((Get-VM -Name $vmName).PowerState -eq "PoweredOff") {
  Write-Host -foreground Green "- VM "$vmName "is already OFF"
}
else
{
    Write-Host -foreground Red "- VM "$vmName "is shutting down ..." 
    $vm | Shutdown-VMGuest  -Confirm:$false
    While ((Get-VM -Name $vmName).PowerState -ne "PoweredOff") {
        Write-Host -foreground yellow "... waiting for" $vmName "to power off"
    sleep 5
    }
}

$ds = Get-Datastore -Name <DATASTORE_TARGET>
$esx = Get-Cluster -VM $vmName | Get-VMHost | Get-Random
$vm = New-VM -VM $vmName -Name $vmName'_CLONE' -Datastore $ds -VMHost $esx

Set-VM $vmName -name $vmName'_Clone' -confirm:$false

Disconnect-VIServer -Server * -Force -Confirm:$false

That's it.

lunedì 4 luglio 2022

NSX-T 3.2.0.1 - Function not (yet) implemented

Issue


Function not implemented.
Browsing through the NSX-T logs of an ESXi host (in /var/log/nsx-syslog.log), I found countless INFO messages of nsx-opsagent service, "Function not implemented", as looks like into the image below.

Therefore I asked information to the Global Support Service of VMware ...

Solution


They told me:

"This is only INFO in the logs, and however, based on the amount, I don't think this is good to happen anyway. NSX-T 3.2.0.1 is the latest release; it could be something opsagent is trying to do, but it's not fully implemented on the host side."

And the reply from the Product Engineering confirm that the log is harmless. It just shows that nsx-vim is interacting with other processes, and that there will be fewer logs for "Function not implemented" in 3.2.1.

That's it.

martedì 19 aprile 2022

NSX-T 3.2 - Traceflow request failed

Issue


New day, new issue :-)
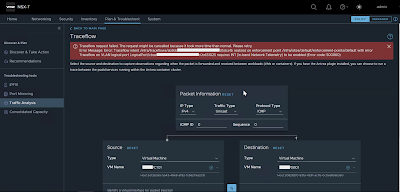
I'm not able to traceflow traffic between two VMs plugged on VLAN backed segment managed by NSX-T 3.2.0.1, obtaining the following error message:

Traceflow request failed. The request might be cancelled because it took more time than normal. Please retry.
Error Message: Error: Traceflow intent /infra/traceflows/<UID> realized on enforcement point /infra/sites/default/enforcement-points/default with error Traceflow on VLAN logical port LogicalPort/<UID> requires INT (In-band Network Telemetry) to be enabled (Error code: 500060)

Looking inside the official documentation "Perform a Traceflow" I noticed that "Traceflow is not supported for a VLAN-backed logical switch or segment" in version 3.0 and 3.1 but it should be supported in version 3.2.
So, why it doesn't work??
I tried running the indicated REST API call "PUT /api/v1/global-configs/IntGlobalConfig" to enable In-band Network Telemetry (INT). Without success !!!

Solution


I found the solution by googling "nsx-t (In-band Network Telemetry) to be enabled (Error code: 500060)", and a post "NSX-T Traffic Analysis Traceflow fails" by "Brian Knutsson" came out. The post explain how to enable the Traceflow in NSX-T 3.2 for vlan backed. Here are the steps performed in my infrastructure.

I made the follofing REST call:
curl -k -u 'admin' -X GET https://<NSX Manager IP of FQDN>/api/v1/infra/ops-global-config 
I kept note of the revision, and use it into the next call ...
curl -k -u 'admin' -X PUT -H "Content-Type: application/json" -d 
'{ 
    "display_name": "ops-global-config",
    "in_band_network_telementry": { 
    	"dscp_value": 2, 
        "indicator_type": "DSCP_VALUE"
    },
    "path": "/infra/ops-global-config",
    "relative_path": "ops-global-config",
    "_revision": 0
}'       
https://<NSX Manager IP of FQDN>/policy/api/v1/infra/ops-global-config 
Now, thanks to Brian it works!!

That's it.

venerdì 8 aprile 2022

NSX-T 3.2.01 - Upgrade failed from 3.1.6

Issue


Today, during the upgrade of NSX-T Data Center infrastructure from 3.1.3.6 version to 3.2.0.1 I faced out the following issue.
All NSX-T Appliance managers have been updated to version 3.2.0.1, but when updating the latest appliance the result was as follows:


looking in System > Lifecycle Management > Upgrade


It was not possible to connect via UI to the NSX-T manager appliances, instead via SSH, the appliances were reachables and updated, but the “get cluster status” NSX manager CLI command output clearly shows that the group status is degraded and that two nodes were down.

Solution


Disclaimer: Some of the procedures described below, may not be officially supported by VMware. Use it at your own risk.

To solve the issue I decided to keep the good NSX-T manager appliance, deactivate the cluster and deploy new appliances from the good one.
As described in this link, in the event of a loss of two of the three NSX-T Manager cluster nodes we must deactivate the cluster.
An interesting guide on NSX-T recoverability was written by Rutger Blom.

But let's proceed step by step.
  • We first need to deactivate the cluster. This operation must be performed from the good/survived NSX-T manager appliance, running the CLI command "deactivate cluster".

  • We can now, delete the NSX-T Manager appliances not good from the UI.
    If something went wrong you also need to detach the node.

  • Let's now reset the NSX-T Upgrade Plan as shown in the KB82042 via API.

    DELETE https://NSX_MGR/api/v1/upgrade-mgmt/plan

    For this to take affect, ssh to the Manager node controlling the upgrade and restart the upgrade service

    > restart service install-upgrade

  • Refreshing the UI .... we can continue with a fake upgrade, clicking on "NEXT - NEXT - DONE" until the end.
  • We have at the moment, a single and operational manager/controller node, upgraded and without error or pending tasks.

    We should be able, from here, to deploy two new NSX-T Manager appliances from the UI, join them to the active cluster node, and come back to this:


That's it.

lunedì 4 aprile 2022

VMFS-6 heap memory exhaustion on vSphere 7.0 ESXi hosts (80188)

Issue


I recently experienced the problem indicated in KB80188 ("VMFS-6 heap memory exhaustion on vSphere 7.0 ESXi hosts"). Not having the possibility to upgrade to later versions where the problem has been fixed. So, to solve the problem, I created a small script that checks the VMFS-6 volumes mounted and executes the workaround indicated in the KB.

Solution


Disclaimer: Use it at your own risk.

The workaround is to create Eager zeroed thick disk on all of the mounted VMFS6 datastores and then delete it.
Below the script:
# Author: Lorenzo Moglie (ver.1.1 04.04.2022)
#
# VMFS-6 heap memory exhaustion on vSphere 7.0 ESXi hosts (80188)
# https://kb.vmware.com/s/article/80188
# filename: kb80188.sh
#
# WARNING : Use the script at your own risk
#

esxcli storage filesystem list | while read -r LINE; do
TYPE=`echo $LINE | awk -e '{print $5}'`
if [ $TYPE == "VMFS-6" ]; then
 VOLUME=`echo $LINE | awk -e '{print $1}'`
 vmkfstools -c 10M -d eagerzeroedthick $VOLUME/eztDisk`hostname`
 esxcli system syslog mark --message="KB80188 - Created disk  $VOLUME/eztDisk`hostname`"
 vmkfstools -U $VOLUME/eztDisk`hostname`;  echo "Deleted."
 esxcli system syslog mark --message="KB80188 - Deleted disk  $VOLUME/eztDisk`hostname`"
fi
done
Workaround has to be done for each datastore on each host.

So I suggest to copy it on each ESXi hosts root and scheduling it in the cron of the host. This because If you copy it on a shared datastore may not work properly on every hosts. A great explanation written by Mike Da Costa of how to schedule tasks in cron on esxi can be found here.

For example
  1. Copy the workaround script into the environment. (In my case /kb81088.sh)
  2. Give the script executable permissions
    chmod +x /kb81088.sh
  3. On each hosts, edit /var/spool/cron/crontabs/root
  4. Add the line to the above file, to schedule the execution every 5 hours
    0 */5 * * * /kb81088.sh
  5. Now, we need to kill the crond PID.
    First, get the crond PID (process identifier) by running the command "cat /var/run/crond.pid"
  6. Next, kill the crond PID. Be sure to change the PID number to what you obtained in the previous step.
    Example running the command "kill 2098332"
  7. Once the process is stopped, you can use BusyBox to launch it again, running the command "/usr/lib/vmware/busybox/bin/busybox crond" to restart crond process

That's it.

mercoledì 30 marzo 2022

NSX-T 3.1.3.6 - Upgrade coordinator, compatibility issue to upgrade to NSX-T 3.2.0.1

Issue


Today, during the upgrade of NSX-T Data Center infrastructure from 3.1.3.6 version to 3.2.0.1 I faced out the following issue.

Verifying that everything was correctly in the compatibility matrix, loaded the .mub file I received the following error:

New NSX Upgrade version is not compatible with current NSX version, you cannot upgrade to this version

Solution


Logged into the NSX Manager CLI as root user I checked the upgrade coordinator log files /var/log/upgrade-coordinator/upgrade-coordinator.log, then I noticed the ERROR line:

Error while calling uc_helper for verification of Upgrade bundle VMware-NSX-upgrade-bundle-3.2.0.1.0.19232396.mub. See uc_helper logs

Since the log file of the uc_helper was not present in the appliance manager, I did a google search and found the KB87835 "NSX-T Manager upgrade blocked by Backup passphrase precheck (87835)"

I followed the workaround described into the KB that consist to perform next steps:
  • Download the correct uc_helper file attached to the KB. In my case 3x_to_3201_uc_helper
  • From the NSX-T UI, identify which Manager is orchestrating the upgrade.
    The upgrade UI page is only active on one Manager and this is the orchestrator node.
  • Copy the downloaded 3x_to_3201_uc_helper.py file to /image directory on the orchestrator NSX Manager node.
  • ssh to the orchestrator node as root user.
    If root access is not allowed, ssh as admin and switch to root user with the "st en" command followed by the root user password
  • Backup the file
    cp /opt/vmware/upgrade-coordinator-tomcat/bin/uc_helper.py /opt/vmware/upgrade-coordinator-tomcat/bin/uc_helper.py.bak
  • Perform remediation
    cat /image/3x_to_3201_uc_helper.py > /opt/vmware/upgrade-coordinator-tomcat/bin/uc_helper.py
  • From the NSX-T UI, retry to upload the upgrade .mub file .... and wait.


Now the Bundle file has been loaded successfully and we can continue with the UPGRADE.

That's it.

venerdì 11 febbraio 2022

zsh: no matches found on cURL

Issue


I just came across this issue when I try to make an API request with cURL, like below, from the MAC terminal.

curl -s -k -u "admin.moglie@dtc.local" -X GET https://192.168.20.216/policy/api/v1/infra?filter=Type-

Returning the error:
zsh: no matches found: https://192.168.20.216/policy/api/v1/infra?filter=Type-

It seems that need to escape the question mark, otherwise zsh thinks it is a globbing or wildcard character and tries to find files that match it.

Solution


The solution is to use double or single quote like below:

curl -s -k -u "admin.moglie@dtc.local" -X GET "https://192.168.20.216/policy/api/v1/infra?filter=Type-"

That's it.

venerdì 28 gennaio 2022

Veeam ONE: Impossible to upgrade to version 11 because the upgrade process find unsupported veeam B&R version

Issue


A customer of mine fails to update Veeam ONE from version 10.0.0.750 to the latest version 11. He encounter the following error message "Veeam ONE database has one or more unsupported Veeam Backup & Replication servers. This product supports Veeam Backup & Replication 9.5 Update 4 or later."


Solution


I tried to see if there were any objects or configurations prior to version 9.5 but I didn't find anything.
The problem encountered may occur when the VBR server, added to Veeam ONE was upgraded before the Veeam ONE upgrade, so automatic upgrade is not possible.
Anyway, there is a workaround for this situation, suggested by veeam support. Is a manual product update.
To solve, follow the instructions below:

1. Make a backup of Veeam ONE database: https://www.veeam.com/kb1471 and then uninstall Veeam ONE on the server completely.

2. Install Veeam ONE v11a with the local database (SQL server express will be installed on the server)

3. After the installation, execute the script from the folder: ISO: Addins\SQLScript\VeeamOne.sql. against the existing Veeam ONE database (on the production SQL server: https://www.veeam.com/kb2312 )

4. Once the script is executed, change the database name in Veeam ONE settings and restart the services as described in the following article: https://www.veeam.com/kb1592

Thanks, to the guys at veeam support.

That's it.

giovedì 13 gennaio 2022

Just a cosmetic issue?? No, PortGroup and Uplink disconnected (on UI) not properly re-assigned after upgrade.

Issue


After an upgrade of the ESXi host from version 7.0.1 to 7.0.2 when the host came back on, the network was no longer properly connected to the DVS.
I then re-added the ESXi host to the various DVSs by reassigning the uplinks to the correct vmnic as originally.
Everything seemed to be working fine (ping, VMs were reachable, the host was properly managed by vCenter, vMotion was OK, then the host was able to mount iSCSI storage correctly etc) when I noticed ...
and ...

Solution


To solve the problem I had to re-assign the VMkernel adapters to the corresponding Portgroup even if they were already present.

So, I proceeded as follows ..
  • Right click with the mouse on DVS affected (The images below refer to a different DVS from that shown by the images above, however the procedure performed does not change).
  • Add and Manage Hosts...
  • Select Manage host networking and click Next
  • Click on Attached Hosts... select the host affected. Click OK and then Next until you get to session 4 Manage VMkernel adapter.
  • Select the vmk of the "On this switch" section (in my case, I start with vmk0 and then with the others) and click Assign portgroup.
  • Select the right portgroup and clik OK.
  • Do the same for the others vmks.
  • Click NEXT, NEXT and then FINISH.
  • As we can see now, from the image below a new "Port ID" has been assigned to the host and the "State" results with the Link Up.
  • But if I look into the Topology view, there is still something to fix ...

    the Uplink1 and Uplink2 State for the host are still down ...
  • Connecting via SSH to the host, I check the status of the nic with the command

    # esxcli network nic list

    I observe, that unlike the graphical interface, the "Link Status" of vmnic20 and vmnic21 are Up.
  • I solved it, putting down and up the vmnic20 and vmnic21 ...

    # esxcli network nic down -n vmnic20
    # esxcli network nic up -n vmnic20
  • Looking the UI ...
    Now everything is OK.

That's it.