martedì 19 aprile 2022

NSX-T 3.2 - Traceflow request failed

Issue


New day, new issue :-)
I'm not able to traceflow traffic between two VMs plugged on VLAN backed segment managed by NSX-T 3.2.0.1, obtaining the following error message:

Traceflow request failed. The request might be cancelled because it took more time than normal. Please retry.
Error Message: Error: Traceflow intent /infra/traceflows/<UID> realized on enforcement point /infra/sites/default/enforcement-points/default with error Traceflow on VLAN logical port LogicalPort/<UID> requires INT (In-band Network Telemetry) to be enabled (Error code: 500060)

Looking inside the official documentation "Perform a Traceflow" I noticed that "Traceflow is not supported for a VLAN-backed logical switch or segment" in version 3.0 and 3.1 but it should be supported in version 3.2.
So, why it doesn't work??
I tried running the indicated REST API call "PUT /api/v1/global-configs/IntGlobalConfig" to enable In-band Network Telemetry (INT). Without success !!!

Solution


I found the solution by googling "nsx-t (In-band Network Telemetry) to be enabled (Error code: 500060)", and a post "NSX-T Traffic Analysis Traceflow fails" by "Brian Knutsson" came out. The post explain how to enable the Traceflow in NSX-T 3.2 for vlan backed. Here are the steps performed in my infrastructure.

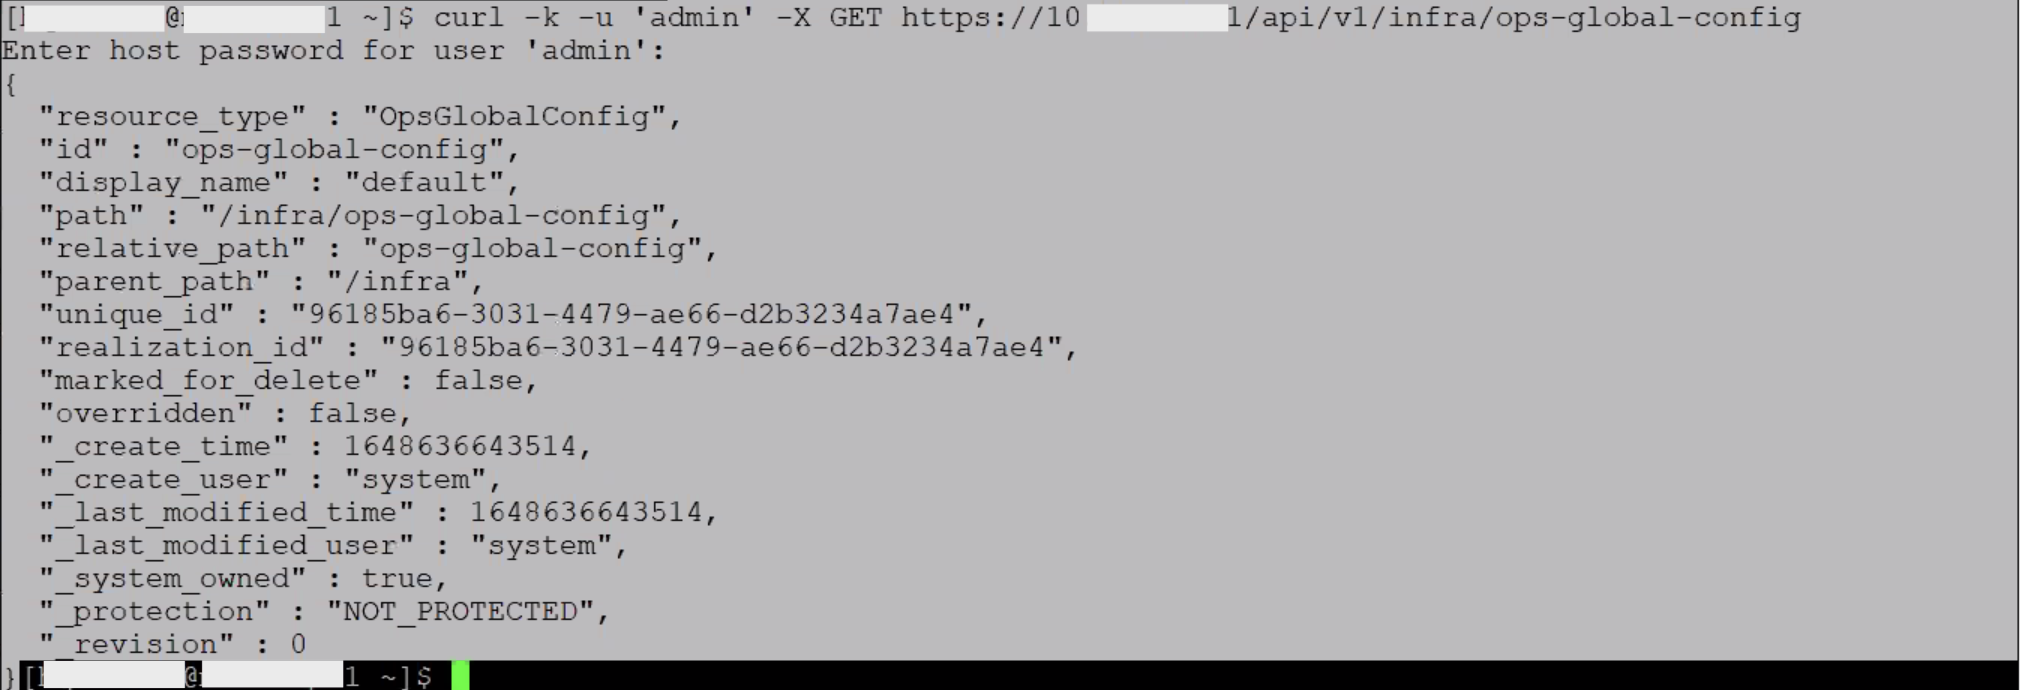
I made the follofing REST call:
curl -k -u 'admin' -X GET https://<NSX Manager IP of FQDN>/api/v1/infra/ops-global-config 
I kept note of the revision, and use it into the next call ...
curl -k -u 'admin' -X PUT -H "Content-Type: application/json" -d 
'{ 
    "display_name": "ops-global-config",
    "in_band_network_telementry": { 
    	"dscp_value": 2, 
        "indicator_type": "DSCP_VALUE"
    },
    "path": "/infra/ops-global-config",
    "relative_path": "ops-global-config",
    "_revision": 0
}'       
https://<NSX Manager IP of FQDN>/policy/api/v1/infra/ops-global-config 
Now, thanks to Brian it works!!

That's it.

venerdì 8 aprile 2022

NSX-T 3.2.01 - Upgrade failed from 3.1.6

Issue


Today, during the upgrade of NSX-T Data Center infrastructure from 3.1.3.6 version to 3.2.0.1 I faced out the following issue.
All NSX-T Appliance managers have been updated to version 3.2.0.1, but when updating the latest appliance the result was as follows:


looking in System > Lifecycle Management > Upgrade


It was not possible to connect via UI to the NSX-T manager appliances, instead via SSH, the appliances were reachables and updated, but the “get cluster status” NSX manager CLI command output clearly shows that the group status is degraded and that two nodes were down.

Solution


Disclaimer: Some of the procedures described below, may not be officially supported by VMware. Use it at your own risk.

To solve the issue I decided to keep the good NSX-T manager appliance, deactivate the cluster and deploy new appliances from the good one.
As described in this link, in the event of a loss of two of the three NSX-T Manager cluster nodes we must deactivate the cluster.
An interesting guide on NSX-T recoverability was written by Rutger Blom.

But let's proceed step by step.
  • We first need to deactivate the cluster. This operation must be performed from the good/survived NSX-T manager appliance, running the CLI command "deactivate cluster".

  • We can now, delete the NSX-T Manager appliances not good from the UI.
    If something went wrong you also need to detach the node.

  • Let's now reset the NSX-T Upgrade Plan as shown in the KB82042 via API.

    DELETE https://NSX_MGR/api/v1/upgrade-mgmt/plan

    For this to take affect, ssh to the Manager node controlling the upgrade and restart the upgrade service

    > restart service install-upgrade

  • Refreshing the UI .... we can continue with a fake upgrade, clicking on "NEXT - NEXT - DONE" until the end.
  • We have at the moment, a single and operational manager/controller node, upgraded and without error or pending tasks.

    We should be able, from here, to deploy two new NSX-T Manager appliances from the UI, join them to the active cluster node, and come back to this:


That's it.

lunedì 4 aprile 2022

VMFS-6 heap memory exhaustion on vSphere 7.0 ESXi hosts (80188)

Issue


I recently experienced the problem indicated in KB80188 ("VMFS-6 heap memory exhaustion on vSphere 7.0 ESXi hosts"). Not having the possibility to upgrade to later versions where the problem has been fixed. So, to solve the problem, I created a small script that checks the VMFS-6 volumes mounted and executes the workaround indicated in the KB.

Solution


Disclaimer: Use it at your own risk.

The workaround is to create Eager zeroed thick disk on all of the mounted VMFS6 datastores and then delete it.
Below the script:
# Author: Lorenzo Moglie (ver.1.1 04.04.2022)
#
# VMFS-6 heap memory exhaustion on vSphere 7.0 ESXi hosts (80188)
# https://kb.vmware.com/s/article/80188
# filename: kb80188.sh
#
# WARNING : Use the script at your own risk
#

esxcli storage filesystem list | while read -r LINE; do
TYPE=`echo $LINE | awk -e '{print $5}'`
if [ $TYPE == "VMFS-6" ]; then
 VOLUME=`echo $LINE | awk -e '{print $1}'`
 vmkfstools -c 10M -d eagerzeroedthick $VOLUME/eztDisk`hostname`
 esxcli system syslog mark --message="KB80188 - Created disk  $VOLUME/eztDisk`hostname`"
 vmkfstools -U $VOLUME/eztDisk`hostname`;  echo "Deleted."
 esxcli system syslog mark --message="KB80188 - Deleted disk  $VOLUME/eztDisk`hostname`"
fi
done
Workaround has to be done for each datastore on each host.

So I suggest to copy it on each ESXi hosts root and scheduling it in the cron of the host. This because If you copy it on a shared datastore may not work properly on every hosts. A great explanation written by Mike Da Costa of how to schedule tasks in cron on esxi can be found here.

For example
  1. Copy the workaround script into the environment. (In my case /kb81088.sh)
  2. Give the script executable permissions
    chmod +x /kb81088.sh
  3. On each hosts, edit /var/spool/cron/crontabs/root
  4. Add the line to the above file, to schedule the execution every 5 hours
    0 */5 * * * /kb81088.sh
  5. Now, we need to kill the crond PID.
    First, get the crond PID (process identifier) by running the command "cat /var/run/crond.pid"
  6. Next, kill the crond PID. Be sure to change the PID number to what you obtained in the previous step.
    Example running the command "kill 2098332"
  7. Once the process is stopped, you can use BusyBox to launch it again, running the command "/usr/lib/vmware/busybox/bin/busybox crond" to restart crond process

That's it.