Visualizzazione post con etichetta Rest API. Mostra tutti i post

lunedì 2 dicembre 2024

[NSX] - API Authentication Using a Session Cookie on PowerShell

Issue


Recently I had to create a PowerShell script that grab some information from NSX via Rest API calls. To do so, I had to create a few lines of code to authenticate on the NSX.
To reduce the number of times that I have to enter username and password and/or they transit over the network, I used NSX session-based authentication method to generate a JSESSIONID cookie when using the API as described here.
The method describe how to create a new session cookie and how to use thex-xsrf-token for subsequent requests for cURL on linux environment. Below here I wrote few lines of code to use the same method in powershell environment.
Let's see below how does it works for powershell ....

Solution


The script must run on an Windows machine, so I decided to make a powershell script. Information regarding api call, can be found at the following link https://developer.vmware.com/apis
I thought was useful share with everyone how to do it, let's see the script:
#
# Create a Session Token 
#
# LM v. 0.2
#
# This script is an example on how to create a session token on NSX and reuse for subsequent requests.
# 


#Script accept in input the FQDN of the NSX Manager to connect on, or leave it blank to use the default "nsx-mgr.vcf.sddc.lab"
param(
    [string] $nsx_manager = 'nsx-mgr.vcf.sddc.lab'
)

#Used to manage/skip certificates
add-type @"
using System.Net;
using System.Security.Cryptography.X509Certificates;
public class TrustAllCertsPolicy : ICertificatePolicy {
    public bool CheckValidationResult(
        ServicePoint srvPoint, X509Certificate certificate,
        WebRequest request, int certificateProblem) {
        return true;
    }
}
"@
$AllProtocols = [System.Net.SecurityProtocolType]'Ssl3,Tls,Tls11,Tls12'
[System.Net.ServicePointManager]::SecurityProtocol = $AllProtocols
[System.Net.ServicePointManager]::CertificatePolicy = New-Object TrustAllCertsPolicy


function createSession {
    $script:session = New-Object Microsoft.PowerShell.Commands.WebRequestSession
    $script:headers = @{}
    $script:nsx_uri = "https://" + $nsx_manager
    $uri = $nsx_uri + "/api/session/create"
    $private:body = "j_username=$($nsx_user)&j_password=$($nsx_pass)" 
    try {
        $response = invoke-webrequest -contentType "application/x-www-form-urlencoded" -WebSession $session -uri $uri -Method 'POST' -Body $body -usebasicparsing -Erroraction Stop
        $xsrftoken = $response.headers["X-XSRF-TOKEN"]
 
        #$response
        $script:loginSuccess = $true
        $script:headers.Add("X-XSRF-TOKEN", $xsrftoken)
        $script:headers.Add("Accept", "application/json")
        $script:headers.Add('Content-Type','"application/x-www-form-urlencoded')
    }
    catch {
        Write-Host "Failed" -ForegroundColor Red
        Write-Host "$($_.Exception)" -ForegroundColor Red
        write-host "Error Details:" $_.ErrorDetails.Message -ForegroundColor Magenta
        $script:loginSuccess = $false
    }
}

#If you want insert Credential on fly uncomment the three lines below here and comment the hardcoded credentials 
#$MyCredential = Get-Credential -Message "Insert $nsx_manager "
#$nsx_user = $MyCredential.UserName
#$nsx_pass = [Runtime.InteropServices.Marshal]::PtrToStringAuto([Runtime.InteropServices.Marshal]::SecureStringToBSTR($MyCredential.Password))

#Harcoded credentials; uncomment if you don't want to insert them with Get-Credential function or comment otherwise
$nsx_user = 'admin'
$nsx_pass = 'VMware123!VMware123!'

#Create the cookie session 
createSession


#how looks like subsequent example requests
#List of segments
$response_q1 = Invoke-webrequest -WebSession $session -uri $($nsx_uri + "/policy/api/v1/infra/segments") -Method 'GET' -Headers $headers -usebasicparsing -Erroraction Stop

#List of tier-1s
$response_q2 = invoke-webrequest -WebSession $session -uri $($nsx_uri + "/policy/api/v1/infra/tier-1s") -Method 'GET' -Headers $headers -usebasicparsing -Erroraction Stop

write-host " ----- Segments ----- " -ForegroundColor Green
write-host $response_q1.Content
write-host 
write-host 
write-host " ----- Tier-1s ----- " -ForegroundColor Green
#write-host $response_q2.Content

# END #

That's it.

giovedì 31 ottobre 2024

[NSX] Dump of the VMs list and its Security TAGs

Issue


Recently I had to create a script that periodically take a snapshot of the current situation regarding the list of Virtual Machines and the associated NSX Security Tags, via rest API calls.
To do this, I had to create some lines of code. Let's see below, the call to get the list of VMs and how it works....

Solution


The script must run on an Ubuntu machine, so I decided to make a bash script and use cURL. Information regarding api call, can be found at the following link https://developer.vmware.com/apis
More specific information regarding NSX, can be found here.

Our call to retrieve informations, looks like this:
curl -sk -u username:password -X GET 'https://{nsx_manager}/policy/api/v1/infra/realized-state/virtual-machines' > vms-all.json
... and from terminal using the "jq" command (with the options "-r '.results[]' ") ...
jq -r ' .results[]' vms-all.json
... the output is as below ...


Now, that we have the whole VMs list on a file, we are able to query it with 'jq' and retrieve information we need such as:
  • we can search for a whole json configuration of a specific VM (for example "db-01a") ...
    jq -r ' .results[] | select(.display_name=="db-01a") ' vms-all.json

  • we can search for the tags of a specific VM (for example "db-01a")
    jq -r ' .results[] | select(.display_name=="db-01a") | .tags' vms-all.json

  • we can count how many VMs are present into the list
    jq -c ' .results[] | [.display_name, .tags]" vms-all.json | wc -l

  • we can list all VMs with their tags
    jq -c ' .results[] | [.display_name, .tags]' vms-all.json

  • .... and so on.

That's it.

mercoledì 9 agosto 2023

[NSX-T] Stale logical-port(s) still connected in NSX-T 3.x

Issue


I was cleaning up a customer's NSX-T configuration to bring some changes, when I saw a lot of logical-ports still connected, more than hundred even if VM was no more present on vCenter.

Solution


I immediately thought of creating a script with rest APIs calls to remove the logical ports from NSX-T Manager. It is possible to find all the NSX-T API calls here.

For rest APIs calls within the bash script I will be using cURL with the suggestions provided here.

First, let's see the rest APIs to use:
  1. to retrieve the IDs of the Logical Ports
  2. to delete the connection

To get the list of Logical-Ports:
GET /api/v1/logical-ports

Below how it looks the command line ...
# lorenzo@ubuntu:~$ curl -ksn -X GET https://{NSX-T MANAGER IP}/api/v1/logical-ports 
... combining to the previous line the jq command and sed, we can extract only the ID field of our interst.
# lorenzo@ubuntu:~$ curl -ksn -X GET https://{NSX-T MANAGER IP}/api/v1/logical-ports |  jq '.results[] | .id' | sed 's/"//g' 
Outcome in the image below.


To get the deletion of the Logical-Port:
DELETE /api/v1/logical-ports/<LogicalPort-ID>?detach=true

We now have all the elements to build the bash script, which looks like the one below...

WARNING: It provided witout warranty. Use it at your own risk and only if you are aware of what you are doing

#!/bin/bash
curl -ksn -X GET https://{NSX-T MANAGER IP}/api/v1/logical-ports |  jq '.results[] | .id' | sed 's/"//g' | while read -r LP_ID
do
 curl -ksn -X DELETE https://{NSX-T MANAGER IP}/api/v1/logical-ports/${LP_ID}?detach=true
 echo " -> "${LP_ID}" removed "
done
... launch the script as below ...
lorenzo@ubuntu:~$ bash remove_all_logical_port.sh 
... the result is the following. All Logial-Ports have been cancelled.


That's it.

lunedì 5 giugno 2023

vRA 8.5.1 REST Api calls - API Authentication

Issue


I need a quick guide (step-by-step) on how to authenticate to vRA 8.5.1 via REST API calls.

Solution


To do that, I found a VMware well documented guide "vRealize Automation 8.5 API Programming Guide"

First of all, we need to know that the process to obtain the access token is different depending upon the vRealize Automation version.
In our case, we need to get the token used to authenticate our session, we use the Identity Service API to get an API token. Then we use the API token as input to the IaaS API to get an access token.

Let's see below the steps on how to do it, using Postman and Curl:
  1. Open Postman.

  2. Execute the following REST API call:

    URL: https://<vRA-FQDN>/csp/gateway/am/api/login?access_token
    Method: POST
    Headers: 'Content-Type: application/json'
    Body: {
    	"username": "username",
    	"password": "password"
    }
    NOTE: If you don't need to authenticate locally (as in our case) replace the above username with your own username in the form username@domain.
  3. Take note of the refresh_token.
  4. Execute the following REST API call:

    URL: https://<vRA-FQDN>/iaas/api/login
    Method: POST
    Headers: 'Content-Type: application/json'
    Body: {
    	"refreshToken": "api_token"
    }
    ... and as output you will receive the token to be used for subsequent vRA queries.


Let's see the same procedure, this time using Curl:
  1. Open a session Terminal with both command, curl and jq already installed.

  2. Assign values to the variables for the hostname of our vRealize Automation appliance, our user name, and password.
    url='https://<vRA-FQDN>'
    username='username'
    password='password'
  3. Execute the following curl command to retrive the API token:
    api_token=`curl -k -X POST \
      "$url/csp/gateway/am/api/login?access_token" \
      -H 'Content-Type: application/json' \
      -H 'Accept: application/json' \
      -d '{
      "username": "'$username'",
      "password": "'$password'"
    }' | jq -r .refresh_token`
  4. With the API token assigned, execute the following curl command to retrieve the Access token:
    access_token=`curl -k -X POST \
      "$url/iaas/api/login" \
      -H 'Content-Type: application/json' \
      -H 'Accept: application/json' \
      -d '{
      "refreshToken": "'$api_token'"
    }' | jq -r .token`
    Note: After 25 minutes of inactivity, the access token times out and we must request it again.

  5. We can now try to obtain more information such as the Organization ID, using the Access Token, by executing the command ...
    curl -k -X GET "$url/csp/gateway/am/api/loggedin/user/orgs" -H "csp-auth-token: $access_token"

That's it.

giovedì 12 agosto 2021

If service is unavailable .... put into maintenance mode the EDGE..

Issue


I was recently asked to create a script, for monitoring by ping a specific service/IP .... and in the event of a fault for three consecutive times to take actions on NSX-T.
In my case, the action to be taken in NSX-T was to put a specific EDGE into maintenance.

Solution


First of all, what we want to realize is a bash script to run on a linux machine ... but, we also need to find out how to retrieve the NSX-T information we need via the REST API.
Let's start finding out how to retrieve information we need from the NSX-T Data Center REST API web site.
Having a linux environment available, my REST API calls will be executed using the curl command. Most API calls require authentication. NSX-T Data Center API supports several different authentication schemes, which are documented in link above. Multiple authentication schemes may not be used concurrently.

For our purpose is enough to use the Basic encoded Authentication. To do this, we modify the following call:
curl -k -u 'admin:VMware1!VMware1!' https://<nsx-mgr>/api/v1/logical-ports
in the

curl -k -H "Authorization: Basic YWRtaW46Vk13YXJlMSFWTXdhcmUxIQ==" https://<nsx-mgr>/api/v1/logical-ports
To encode the string 'admin:VMware1!VMware1!' it's enough execute, on a linux machine the command

echo -n 'admin:VMware1!VMware1!' | base64
Now, we need to retrieve the proper information regarding the EDGE (in my case "edge01a") we want to collect; executing the following command:

curl -k -H "Authorization: Basic YWRtaW46Vk13YXJlMSFWTXdhcmUxIQ==" https://<nsx-mgr>/api/v1/transport-nodes
From the outcome let's look for the display name row with the edge name (in my case edge01a as shown below) and take note of the identifier "id" indicated in the line above ("id": "32340c58-6f28-412c-9f75-c455f8d11323").

If we run the modified command as below, we get detailed information about the edge.

curl -k -H "Authorization: Basic YWRtaW46Vk13YXJlMSFWTXdhcmUxIQ==" https://<nsx-mgr>/api/v1/transport-nodes/32340c58-6f28-412c-9f75-c455f8d11323


Now we have collected all the information we need we can create the bash script as the following
#!/bin/bash
#
# Author: Lorenzo Moglie (ver.1.0 28.05.2021)
#
# IP = Active Service/IP that we want monitoring by pinging every $sleeptime (in seconds). 
#      After 3 unsuccessful attempts it performs (in our case) the failover forcing the maintenance of the EDGE (edge01a)
# sleeptime = can be set (below), time between one ping and the next by default is 1
# NSX = NSX-T Manager on which we want to launch the command
# WARNING : NSX-T Parameters to use in Basic Authorization according to your own needs, in my case:
#           Username = admin
#           Password = Vmware1!VMware1!
#           EDGE ID must be found earlier in my case 32340c58-6f28-412c-9f75-c455f8d11323
#

IP='<IP>'
sleeptime=1
NSX='<nsx-mgr>'

NPing=0
while true; do
 if [ "$NPing" -eq 3 ] 
 then
   NPing=0
   curl -k -X POST -H "Authorization: Basic YWRtaW46Vk13YXJlMSFWTXdhcmUxIQ=="  https://$NSX/api/v1/transport-nodes/32340c58-6f28-412c-9f75-c455f8d11323?action=enter_maintenance_mode
 else
 fi
 ping -c1 $IP 2>/dev/null 1>/dev/null
 if [ "$?" = 0 ]
 then
  NPing=0
  echo "OK"
 else
  echo "Failure $NPing"
  NPing=`expr $NPing + 1`
 fi
 sleep $sleeptime
done 
let's see how the script it works below...... as soon as the IP become unreachable .... after three failed attempts.. send the command to put into maintenance mode the edge.

That's it.
martedì 26 gennaio 2021

NSX-T 3.0 - While deleting Logical Segment, it got stuck in “Deletion in Progress” state and grayed out from UI.

Issue
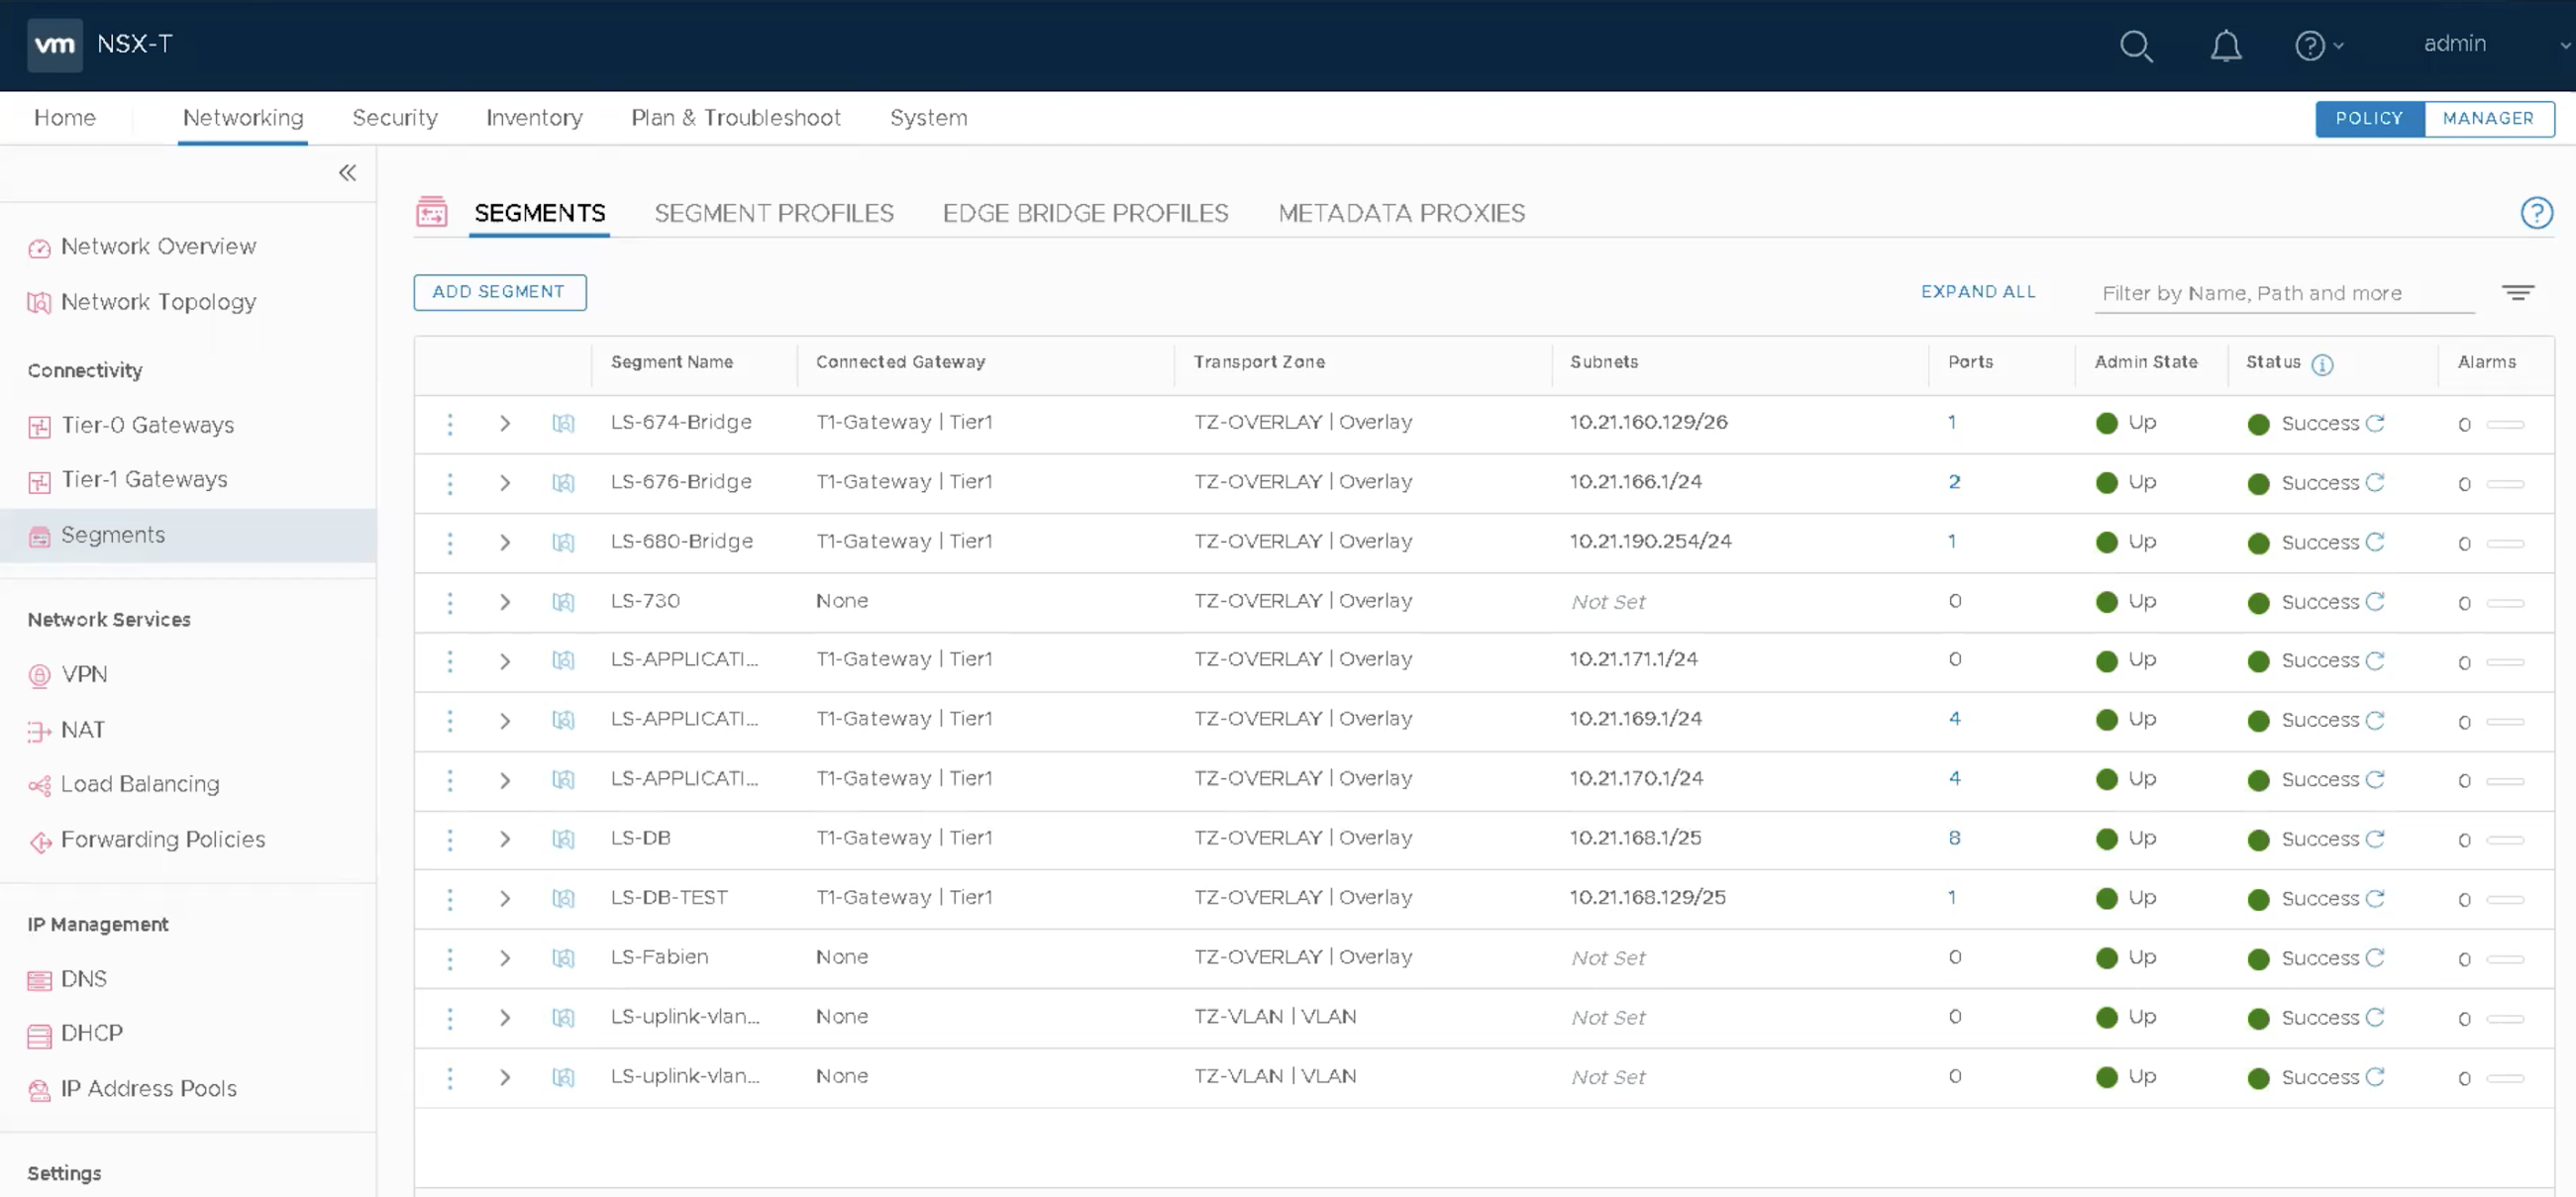
Today, I have been called by a customer to solve a rather unusual problem. The process of deleting a Logical Segment on an NSX-T 3.0 infrastructure it got stucked in "Deletion in Progress" state for days and grayed out from UI without therefore to have the possibility to take any kind of action.


I tried to look for further information regarding the LS stuck

I tried to verify if by editing, in some way it was possible to undertake and/or force cancellation operations ...

I switched to Manager mode to have a different point of view ....
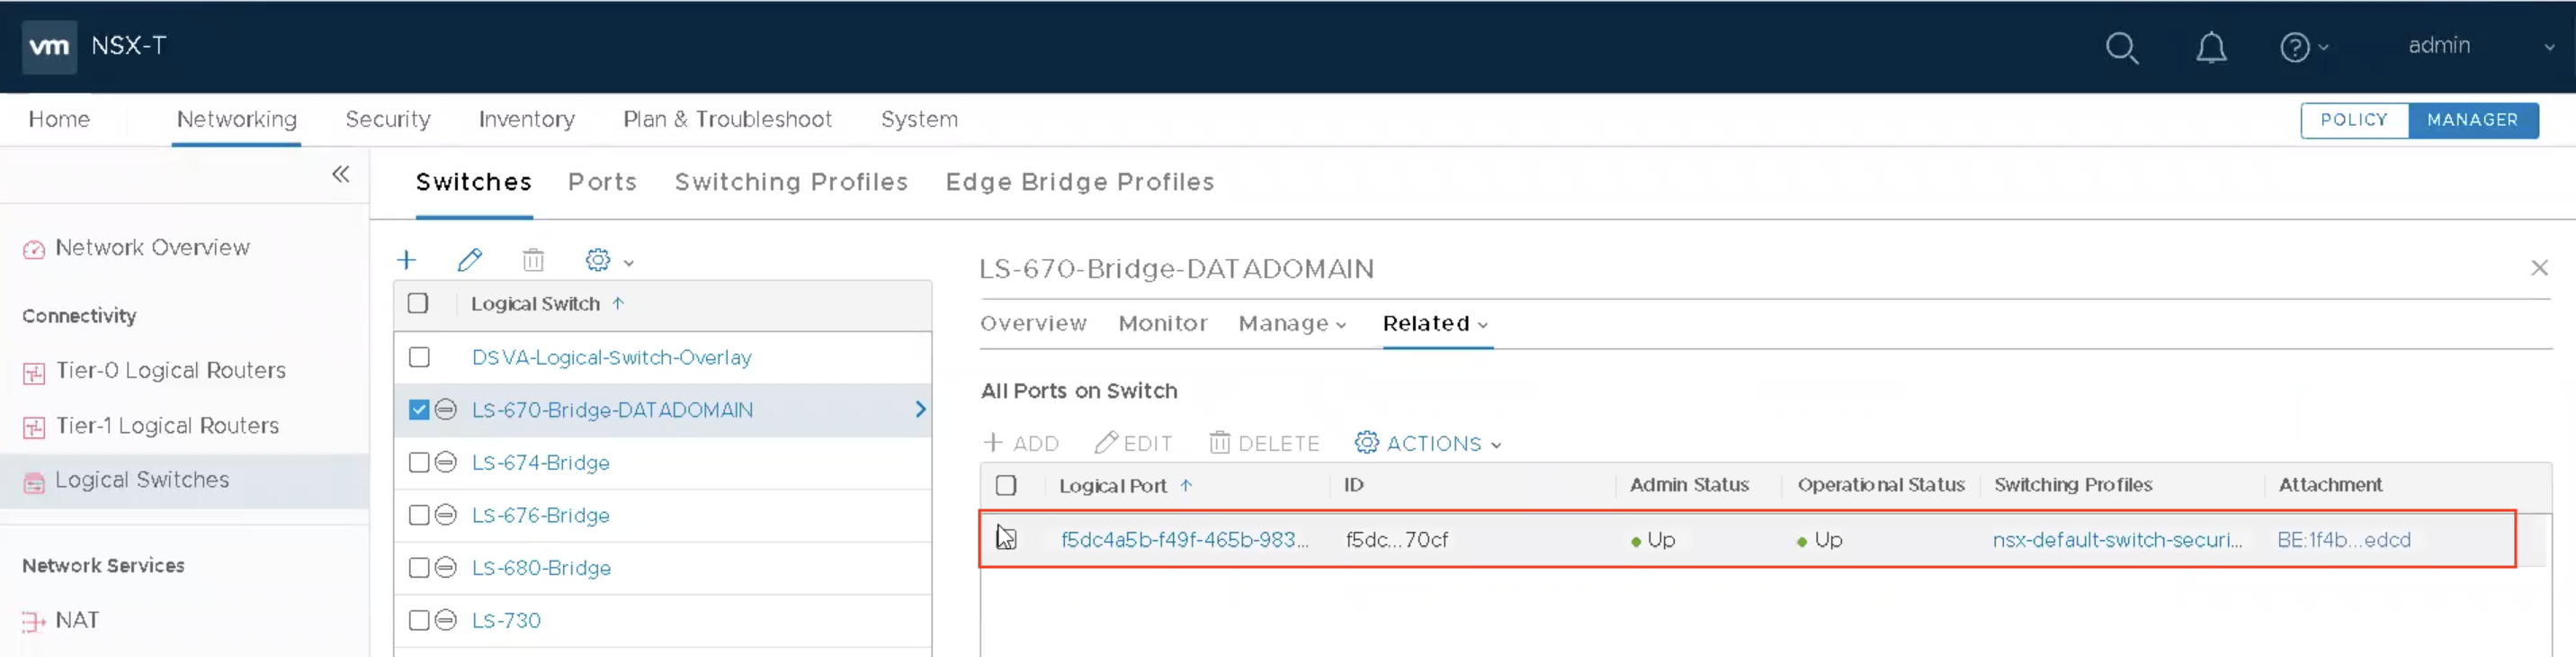
I noticed that there was a "Logical Port" that could block the deletion process ...

open, I tried to delete it, but here too the DELETE botton was grayed out ...

Then I decided to deep investigate inside the NSX-T Manager console in the following way as detailed below....


Disclaimer: Procedures described below may not be officially supported by VMware. Use it at your own risk. Before to perform any action described be sure that you have a valid backup. The best way is to open a Service Request to the support.


Solution
First of all I logged in via SSH to NSX-T Manager with the admin user and then raised the permissions to the root user level.

I moved into the directory "/var/log/policy" ...
root@NSXM-01:~# cd /var/log/policy/ 
Checked the policy.log log file for information about the switch to delete. In my case (verifying the dates) the information I was looking for were present in the .1.log.gz file ...
root@NSXM-01:/var/log/policy# zcat policy.1.log.gz | grep -i <LS NAME> 

I therefore wanted to check the realized state. When you make a configuration change, NSX Manager typically sends a request to another component to implement the change. For some entities, if you make the configuration change using the API, you can track the status of the request to see if the change is successfully implemented.

The configuration change that you initiate is called the desired state. The result of implementing the change is called the realized state. If NSX Manager implements the change successfully, the realized state will be the same as the desired state. If there is an error, the realized state will not be the same as the desired state.

Below the command executed to check the Logical Segment in stuck and the output ...
root@NSXM-01:/var/log/policy# curl -k -u admin -X GET "https://localhost/policy/api/v1/infra/realized-state/realized-entities?intent_path=/infra/segments/LS-670-Bridge-DATADOMAIN"
Enter host password for user 'admin':
{
  "results" : [ {
    "extended_attributes" : [ {
      "data_type" : "STRING",
      "multivalue" : false,
      "values" : [ "/infra/tier-1s/T1-Gateway" ],
      "key" : "connectivity_path"
    }, {
      "data_type" : "STRING",
      "multivalue" : true,
      "key" : "l2vpn_paths"
    } ],
    "entity_type" : "RealizedLogicalSwitch",
    "intent_paths" : [ "/infra/segments/LS-670-Bridge-DATADOMAIN" ],
    "resource_type" : "GenericPolicyRealizedResource",
    "id" : "infra-LS-670-Bridge-DATADOMAIN-ls",
    "display_name" : "infra-LS-670-Bridge-DATADOMAIN-ls",
    "path" : "/infra/realized-state/enforcement-points/default/logical-switches/infra-LS-670-Bridge-DATADOMAIN-ls",
    "relative_path" : "infra-LS-670-Bridge-DATADOMAIN-ls",
    "parent_path" : "/infra/realized-state/enforcement-points/default",
    "unique_id" : "13fd4bf5-f067-4806-9317-93013928b0d0",
    "intent_reference" : [ "/infra/segments/LS-670-Bridge-DATADOMAIN" ],
    "realization_specific_identifier" : "11104acc-5aac-4e50-8689-c31492d455f4",
    "realization_api" : "/api/v1/logical-switches/11104acc-5aac-4e50-8689-c31492d455f4",
    "state" : "ERROR",
    "alarms" : [ {
      "message" : "Unable to delete logical port with attachments of LogicalPort LogicalPort/f5dc4a5b-f49f-465b-9832-86151b3670cf.",
      "source_reference" : "/infra/realized-state/enforcement-points/default/logical-switches/infra-LS-670-Bridge-DATADOMAIN-ls",
      "error_details" : {
        "error_code" : 8402,
        "module_name" : "NsxSwitching service",
        "error_message" : "Unable to delete logical port with attachments of LogicalPort LogicalPort/f5dc4a5b-f49f-465b-9832-86151b3670cf."
      },
      "resource_type" : "PolicyAlarmResource",
      "id" : "REST_API_FAILED",
      "display_name" : "a2759a0c-0c98-4e6b-abd0-c58ea326c5be",
      "relative_path" : "a2759a0c-0c98-4e6b-abd0-c58ea326c5be",
      "unique_id" : "fe05784c-3f69-4ca8-9a01-9df9e3750e8b",
      "_system_owned" : false,
      "_create_user" : "system",
      "_create_time" : 1611589503519,
      "_last_modified_user" : "system",
      "_last_modified_time" : 1611589503521,
      "_protection" : "NOT_PROTECTED",
      "_revision" : 0
    } ],
    "runtime_status" : "UNINITIALIZED",
    "_system_owned" : false,
    "_create_user" : "system",
    "_create_time" : 1610550767404,
    "_last_modified_user" : "system",
    "_last_modified_time" : 1611229785697,
    "_protection" : "NOT_PROTECTED",
    "_revision" : 42
  } ],
  "result_count" : 1
}
root@NSXM-01:/var/log/policy#
From the previous output it is evident that the Segment is in an ERROR state, because it is blocked by the logical ports which are still being attacked .....

"message" : "Unable to delete logical port with attachments of LogicalPort LogicalPort/f5dc4a5b-f49f-465b-9832-86151b3670cf."

Next step, is to attempt to delete the STALE Logical Port via UI. Owever, as we realized before is not possible to delete Logical Port via UI. The second option is to delete the logical port via API which fails too if you use vanilla Logical Port DELETE operation.
Before to delete it, I retrieve information about the Segment and perform NSX-T backup... in case they will be needed later....
root@NSXM-01:/var/log/policy# curl -k -u admin -X GET "https://localhost/api/v1/logical-ports/f5dc4a5b-f49f-465b-9832-86151b3670cf"
Enter host password for user 'admin':
{
  "logical_switch_id" : "11104acc-5aac-4e50-8689-c31492d455f4",
  "attachment" : {
    "attachment_type" : "BRIDGEENDPOINT",
    "id" : "1f4bd81c-83c6-43be-b690-a9aac5a6edcd"
  },
  "admin_state" : "UP",
  "address_bindings" : [ ],
  "switching_profile_ids" : [ {
    "key" : "SwitchSecuritySwitchingProfile",
    "value" : "47ffda0e-035f-4900-83e4-0a2086813ede"
  }, {
    "key" : "SpoofGuardSwitchingProfile",
    "value" : "fad98876-d7ff-11e4-b9d6-1681e6b88ec1"
  }, {
    "key" : "IpDiscoverySwitchingProfile",
    "value" : "64814784-7896-3901-9741-badeff705639"
  }, {
    "key" : "MacManagementSwitchingProfile",
    "value" : "1e7101c8-cfef-415a-9c8c-ce3d8dd078fb"
  }, {
    "key" : "PortMirroringSwitchingProfile",
    "value" : "93b4b7e8-f116-415d-a50c-3364611b5d09"
  }, {
    "key" : "QosSwitchingProfile",
    "value" : "f313290b-eba8-4262-bd93-fab5026e9495"
  } ],
  "ignore_address_bindings" : [ ],
  "internal_id" : "f5dc4a5b-f49f-465b-9832-86151b3670cf",
  "resource_type" : "LogicalPort",
  "id" : "f5dc4a5b-f49f-465b-9832-86151b3670cf",
  "display_name" : "f5dc4a5b-f49f-465b-9832-86151b3670cf",
  "_system_owned" : false,
  "_create_user" : "admin",
  "_create_time" : 1610731219571,
  "_last_modified_user" : "admin",
  "_last_modified_time" : 1610731219571,
  "_protection" : "NOT_PROTECTED",
  "_revision" : 0
}
root@NSXM-01:/var/log/policy#
We are now ready to perform forceful deletion of the Logical Port inside NSX-T database, in the following way ...
root@NSXM-01:/var/log/policy# curl -k -u admin -H "Accept:application/json" -H "Content-Type:application/json"  -X DELETE "https://localhost/api/v1/logical-ports/f5dc4a5b-f49f-465b-9832-86151b3670cf?detach=true"

Removed the blocking object, in our case the Logical Port, the deletion process of the Logical Segment was successfully completed by removing the Segment itself.
It takes a few moments for the deletion process to be completed ... after that, checking into Networking > Segments, the Logical Segment has gone.

That's it.

lunedì 27 aprile 2020

NSX-T - Error to fetch SSH Fingerprint

Issue
Recently I needed to set up backups of a NSX-T Manager for a one time backup. I have performed the procedures shown in this link: I logged in with admin privileges to an NSX Manager at https://<nsx-manager-ip-address>. Selected System > Backup & Restore then Edit (in the upper right of the page to configure backups) and filled up all forms except the once regarding the SSH fingerprint of the server that stores the backups, because as indicated, I could leave it blank.
Doing so, I received the following error message:

Error while fetching fingerprint of fileserver Algorithm negotiation fail. Possibly, there is no ecdsa and ed25519 support for public keys (Error code: 29259)
- Please retry or provide the fingerprint.


By carefully reading the documentation about the Prerequisites, at the link says:

Verify that you have the SSH fingerprint of the backup file server. Only an SHA256 hashed ECDSA key is accepted as a fingerprint. See Find the SSH Fingerprint of a Remote Server.

Solution
In case was not practicable to follow the instructions suggested in the link, is it possible to get the SSH Fingerprint of a Remote Server through a REST API request. Info about NSX-T Data Center API Guide regarding NSX-T Data Center 2.5.0 can be found here.

So, to fetch the SHA256 fingerprint of the SFTP backup target, in my case, I used the following CURL command:

curl --user admin -H 'Content-Type: application/json' --request POST  https://<nsx-manager-ip-address>/api/v1/cluster/backups?action=retrieve_ssh_fingerprint -k -d '{ "server":"<Target-Backup-IP-Address>","port":22}'

The NSX-T Manager API responds with the SHA256 fingerprint of the SFTP server:


A very great post on configuring and troubleshooting NSX-T SFTP backups, wrote by Gary Hills is available here.


That's it.